Downloaded some free explosion or blood stock footage from detonationfilms or footagecrate and don’t know how to get rid of the solid black background of the clip? This tutorial will show you how!
What are Alpha Channels and Why Do I Care?
Most stock footage you can download for free from the internet does not have a proper alpha channel set up. When you drag the clip into your composition in After Effects, it will probably look like this:
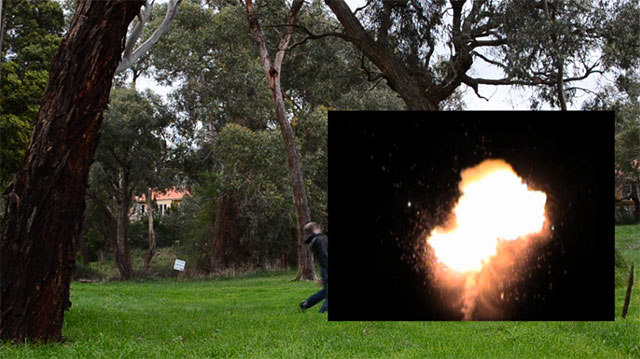
Professional stock footage elements, such as the amazing Action Essentials 2 stock footage pack by Video Copilot, are usually pre-keyed. This means, that the solid black (or green or blue) background has already been removed and the video has a proper alpha channel that defines its transparency.
Here is an explosion from Action Essentials imported into the same composition in Adobe After Effects:
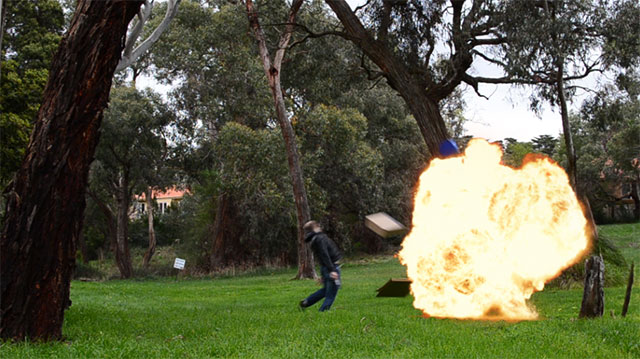
However, since Action Essentials 2 is not free, you may simply prefer to use stock footage you can find on other sites online. Fortunately, removing the solid black background from your explosion or blood elements is really easy so let’s look at how you can do that!
Remove Black Background using Blend Modes
Every layer in your composition in Adobe After Effects has a Blend Mode that determines how this layer is composited onto the layers below it.

By default, the Blend Mode is set to ‘Normal’. If you are working with explosions or fire, a very simple way to remove the solid black background is to change the Blend Mode to ‘Screen’ or ‘Add’.
This will alter how the pixels of the layer are combined with the layers below and since both of these modes (in one form or another) incorporate the luminance (brightness) of the pixels to calculate the opacity, the black background will disappear entirely.

While this works great for explosions or fire elements, it does not really work for blood or dirt or debris. Because these elements are themselves rather dark, the Screen or Add blend modes will cause the stock footage elements themselves to become very faint and semi-transparent.
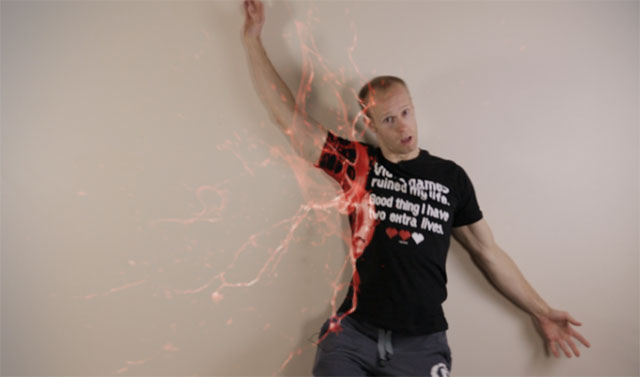
In those cases you need to remove the black background using a colour key effect.
Remove Black Background using a Color Key
After Effects contains numerous effects for colour keying. Colour keying is the technique of cutting out pieces of your video layer based on a particular colour, called a ‘key’. One of the effects I use a lot in After Effects is the inbuilt ‘Linear Color Key’ effect.
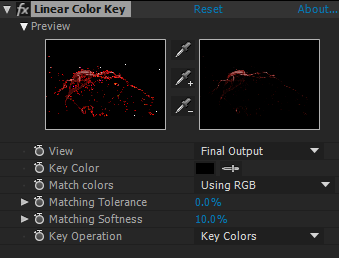
Apply this effect to your stock footage element. The Linear Color Key is a very simple effect with only a few options and the only thing you have to do is use the color picker for the Key Color property and click on the solid black background of your stock footage clip.

Depending on the type of stock footage you can tweak the effect using the Matching Tolerance and Matching Softness properties.
The Matching Tolerance controls how close the colour needs to be to the Key Color you selected to be removed. If the background has a few areas that are not completely black it can be useful to increase this tolerance a little bit to make sure the stock footage element is properly cut out.

The Matching Softness is used to soften the edges of the color key effect. For elements such as explosions and fire you will likely want a softer edge and you can achieve that by increasing the Matching Softness of the Linear Color Key effect.

This is everything you need to know about how to remove a black background from your stock footage! Now let’s look at how to remove green or blue screen backgrounds from our clip!
FREE Adobe After Effects Beginner Course
Remove Green Screen / Blue Screen using Keylight
The moment your clip background is no longer black, changing the Blend Modes is no longer an option. Here is a smoke stock footage element against a green backdrop, set to ‘Screen’ blend mode.
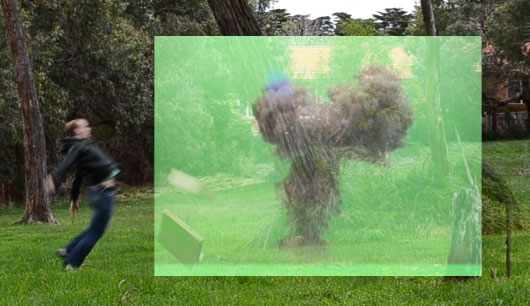
Yeah, it does look rather silly. You could use the Linear Color Key as we did before, but if you are working with a subject shot against a green screen or a blue screen, I recommend using the much more powerful ‘Keylight’ effect in Adobe After Effects. The Linear Color Key might struggle with the texture, shading and gradient that you can get with green / blue screen backdrops.
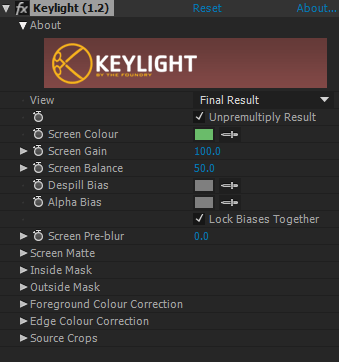
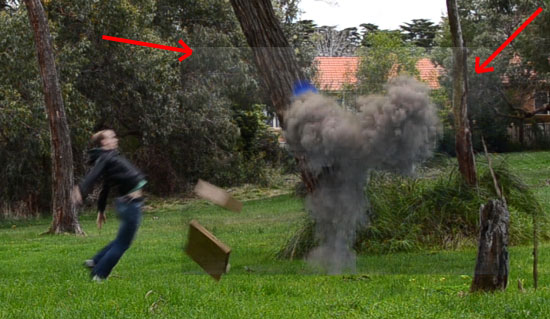
After you apply the effect to your stock footage clip, use the Screen Color picker to select the green of the green screen. Most of the green screen should immediately be removed from your clip! However, due to gradients and shadows on the green screen, it may not be removed cleanly. You can clearly see rather ugly artefacts around our smoke element.
To fix this we have to clean up the ‘Screen Matte’ of the Keylight effect. To do this, simply change the View property of the Keylight effect to ‘Screen Matte’. You will see a greyscale representation of the effect. Black areas are considered transparent, white areas are opaque. Grey is semi-transparent and we want to reduce the grey areas to get a cleaner key.
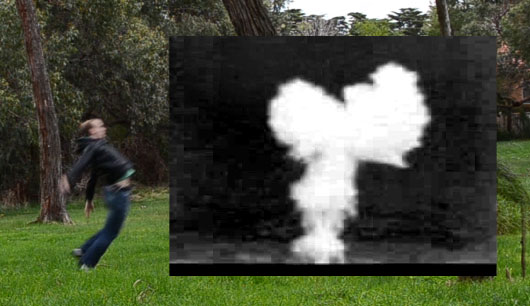
To do this, increase the Clip Black property and lower the Clip White property to tighten the edges of the green screen and remove everything around our smoke element.
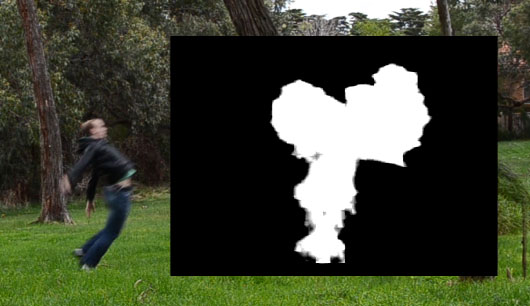
Then switch the View property of the Keylight effect back to ‘Final Result’ and the smoke element will now be properly separated from the green background against which it has been shot.
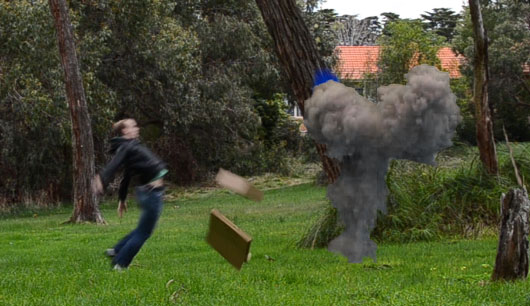
It’s that simple and now you should have everything you need to get plenty of good use out of all the great free action stock footage elements you can find online!



16 Responses
hey, thanks dude :v thakns for the tips!
Like
Like your tutorials.
But it seem you not produce new one since January.
I don’t know why.
However, I always keep follow you.
Thanks
Thank you! I just don’t blog about them as much, but there have been lots of new ones since January. Check out my YouTube channel! https://www.youtube.com/SurfacedStudio
Thank you, great
Yes sir i would like this
what software do you use for the vfx?
It says so in the video and the post ;)
Your tutorials are great! I learned a lot from them, and I’m still learning. I have an issue, though, It’s about the Add blending mode…. I blend a layer with dark background into my footage , but if I close the layer beneath it and want to export the animation with Alpha, the black area reappears. I understand why this happens, but is there any other way to export my animation (with transparent background) and without the black area? Thank you!
Thank you for the feedback! When you export, are you exporting it with a proper alpha channel? If you don’t, it’ll simply be substituted with black
hello, i have an explosion footage with both fire and black smoke and whenever i use the linear key, the smoke is keyed out as well, please What do i do?
Depends on the background. If it’s on a green background you can key out just the green. If it’s on black you may find it impossible to retain the smoke as it’s too close to the colour you have to remove
Hi… How Can I removed the black background on Pinnacle Studio 19? Some takes automatically erase but others not. So please. What can I do? Thanks a lot and congratulations for this tutorials.
Thanks. Since I have never used Pinnacle Studio I don’t know how – or if – you can remove a black background in the software. That might be a question for their forums or support team
Hey! Guys thanks for the pieces, it’s awesome
You are welcome! Thanks for the comment!