3dsMax Particle Flow Birth Texture for Spawning Crows
We will set up a particle system in 3dsMax where each particle will be an animated 3D model of a crow. To make this effect look realistic, we need to spawn the crows correctly where the person is standing. I want the crows to spawn gradually from Celina’s feet to her head just as she is spinning around.
To achieve this, Particle Flow, the particle system available to us in 3dsMax, has a particular type of particle source called a birth texture. The birth texture allows you to use the any object in your scene and spawn particles from the bright areas of the (animated) material assigned to it. We can set up a plane in 3dsMax to match our scene and assign an animated texture to it that defines where our crows will emerge during the animation.
Here is what an animated material spawning particles might look like in 3dsMax.

In order to spawn the crows exactly where Celina is standing gradually from her feet to her head, we need to first create the animated texture that defines where they will spawn. We want an entirely black image where a white stripe swipes up Celina’s body exactly where we want the particles to be emitted.
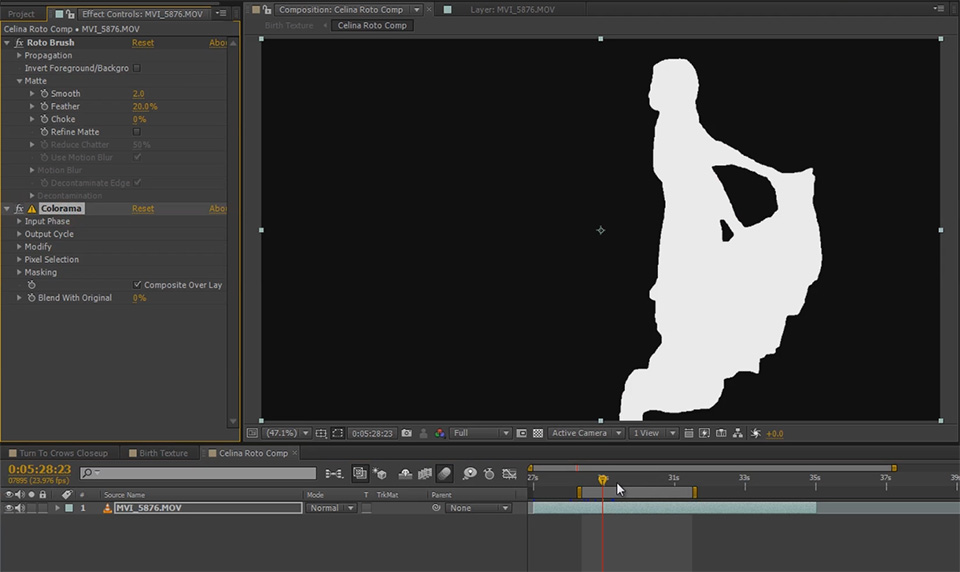
Apply the Colorama effect to the layer inside the pre-composition and set the output to a solid white. This should give you a solid white silhouette of your actor for the time span where you want the crows to spawn.

Now go back to your parent composition and apply a simple animated mask to mark the area where you want the crows to spawn and when. Mine sweeps up from Celina’s feet to heir head while she is spinning.

We will use this white strip for the birth texture material in pFlow to define the area where we will spawn the crows during the animation. Of course we don’t want anything of the background to be in the birth texture material, so disable your base footage when rendering your comp and render it out as an image sequence.
You should end up with a black scene with nothing but the white strip defining where the crows will be spawned.

Also render out the actual footage you have shot (including the actor) as an image sequence. We will use this as an animated background in our viewport to act as a guide when setting up the effect.
But now it’s time to get get our feet wet and jump into 3dsMax!


3 Responses
Compelling tutorial. I have attempted to emulate the animated mask; however the silhouette remains solid white in the parent composition. There appears to be a key step that eludes the completion of the true render for the pFlow. Any postulation… best, Campbell
I’m not sure what you mean. Are you having troubles animating the mask for the birth texture in After Effects?
hi, i like you tutorials very much :)
i don’t know how to work with 3dsmax
can u please tell me how to Do 3D integrations using C4D :)
I am doing this tutorial and it’s amazing…however, my crows are not spreading outward from the birth texture….they all are remaining within the plane….Can you help me figure out what I’m doing wrong? Thanks so much!