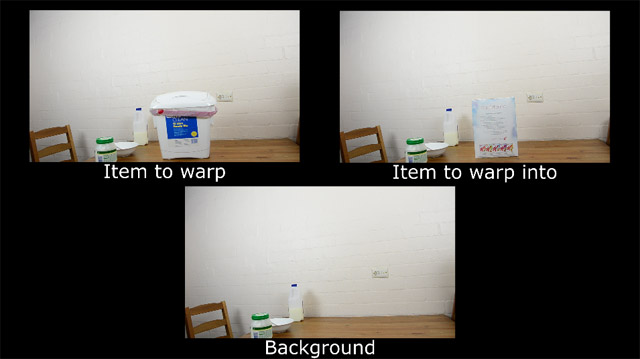
One effect that is used a lot in modern fantasy and sci-fi TV shows is the morph / warp effect. You can use this visual effect to morph any object or person into anything you want to! I hope you enjoy the tutorial :)
Morph Effect Breakdown

In the example above, I am morphing a trash bin into a cereal box. Ignoring the visual sugar on top, the basic morph effect comes down to 2 simple elements:
- Reshaping the trash bininto the cereal box as it fades out
- Reshaping the cereal boxfrom the trash bin as it fades in
Creating the morph effect
To create the morph effect in Adobe After Effects, you will need 3 elements:
- Background footage
- Footage with the source object in place
- Footage with the target object in place

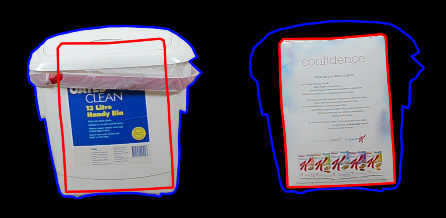
Next, you have to mask out the two object you want to use for the morph effect.
For this example, I am going to morph the trash bin in to the cereal box – I’ve masked out both objects.
In order to perform the reshaping of the object, we are going to use the Reshape effect available in Adobe After Effects.
This effect requires 2 masks on a layer to function, a source mask and a destination mask. The Reshape effect then warps the contents of the source mask to fit into the shape of the destination mask.
For this, and this is important,
- Copy the cereal box mask onto the trash bin layer and set its mask mode to ‘none’
- Copy the trash bin mask onto the cereal box layer and set its mask mode to ‘none’
Each layer should now contain 2 masks. The duplicated masks will function as our destination masks for the Reshape effect.

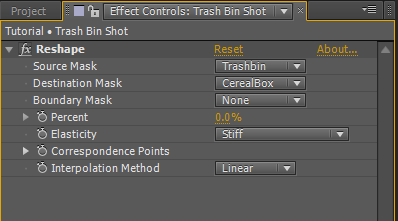
Next, apply the Reshape effect to your source and target layers. You can find the effect in your Effects and Presets window inside Adobe After Effects.
Set the source mask to the active mask for the layer and set the destination mask to the duplicated mask whose mask mode we’ve set to ‘none’. For example, for my trash bin layer, the trash bin mask is my source and the cereal box is my target.

If you now change the reshape percentage, you should see the trash bin being morphed into the form of the cereal box. However, this will likely look all twisty and weird!
This is because we have not yet set up the correspondence points!
Correspondence points
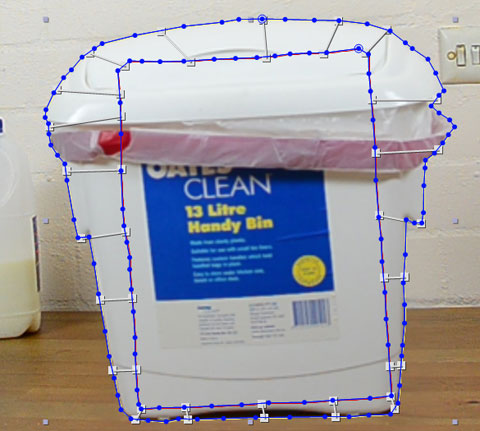
Correspondence points are pairs of locations that relate a position on the source mask to a specific position on the target mask. These points are used by the Reshape effect to determine how to morph the object.
To see the current correspondence points, expand the correspondence points property and click on the label indicating ‘Number of Pairs’.
On your screen, connecting the two masks, you should now see all the current correspondence points – which at the moment should only be one and likely even that one is not set up properly.
You can adjust the correspondence points by simply dragging their start and end markers. You can add additional correspondence points by alt-clicking on either the source or destination mask used for the Reshape effect. Add and adjust the points until your reshape effect looks like you want it to :)

The last thing to do is to animate the Reshape percentage as well as the opacity for the two objects for the morph effect.
Animate the Reshape percentage of the source object from 0 to 100% and the layer opacity from 100 to 0%. This will cause the source object (trash bin) to reshape to the target object (cereal box) as it fades out.
Animate the Reshape percentage of the target object from 100 to 0% and the layer opacity from 0 to 100%. This will cause the target object (cereal box) to fade in as it takes shape from the source object (trash bin).

When performing this effect with actors rather than static objects you may have to animate the masks and do a little roto-scroping or patch up work to make the effect look nice and clean!
Add particles, glows and other effects to taste and your morph effect is complete :)


11 Responses
I love this video
Thank you that was so helpful!
Thanks so much for this tutorial and indeed all the others… I stuck with it and got at least some sort of result….I’ve only had AE for a few days but loving it…..
New AE user here, this is such a fun tutorial to do!!! Thank you for being so generous and sharing knowledge like these with us! :)
i like it
THANK YOU THANK YOU THANK YOU :)
No worries!
Whenever I copy my destination mask it gets re-sized to something smaller than the original. Any idea of what I may be doing wrong?
You have scaled up or down one of your layers and the mask adjusts to the size of the layer. Keep your layers at exactly 100% scale. If you need to zoom in/out, pre-compose the layer and then apply the masks across
Hi Tobias,
Thanks for your help. That solved the scaling problem. However, I’ve run into another problem. For whatever reason the morph takes place within the rectangle that the image resides (PNG image). In other words the morph doesn’t expand out to the shape I’m aiming for. Sorry to bother you so much. I’m a newbie at AE.
The moment your mask extends past the edges of your actual layer, there is no information for After Effects to ‘fill in’. I recommend checking out my beginner tutorial series (especially the episode on masking) here: https://www.youtube.com/playlist?list=PLs2aOcA-EaLN1TwemqyxdjTg2puGtwvkQ