This one is for all the Star Wars fans out there!
Learn how to create the lightning hands effect when the Emperor tries to shock young Skywalker into supporting the Dark Side :)
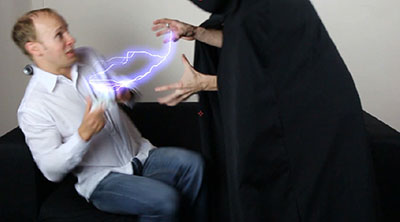
This is the final lightning effect we will be creating in this Adobe After Effects tutorial:

Shocking!
Creating Lightning In Adobe After Effects
I have some footage here of Jimmy from Jimmy America pretending to electrocute me Emperor style. Obviously his control of the force isn’t yet strong enough so there are no actual lightnings going on.

To help him master the force, we can easily use After Effects!
First, create a new solid. The easiest way is to right click into your layers window and select New -> Solid.

I will call my layer ‘Lightning’. The colour for this new solid doesn’t matter, just click OK to create it.
Now go over to the Effects & Presets panel on the right hand side of the interface and search for the Advanced Lightning effect.
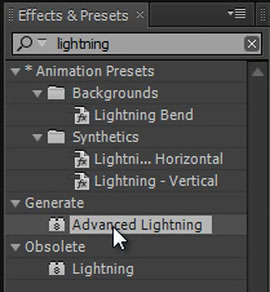
To apply the Advanced Lightning to the newly created solid, make sure the solid layer is selected and then double click on the Advanced Lightning effect. Alternatively, you can also drag and drop the effect onto the layer. You should now see a lightning strike down the middle of your composition.
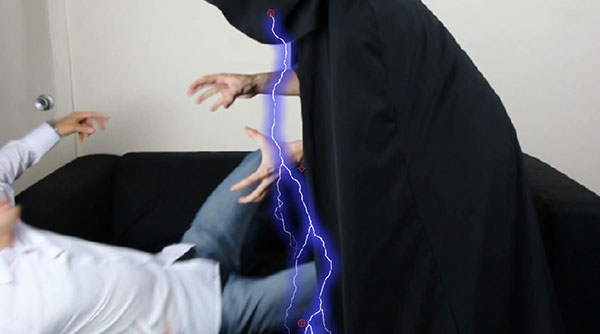
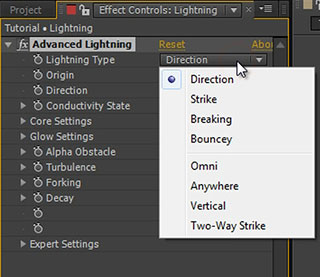
Since we want the lightning to be a little bit more targeted and come out of Jimmy’s hands and shoot towards me, we first need to change the Lightning Type to ‘Strike’.
This will cause the lightning to strike from the Origin to the Direction marker. You can drag these markers (shown as little red circles) around directly in you preview window to have your lighting start and end wherever you want. I will make it come out of Jimmy’s hands and hit me in the chest.
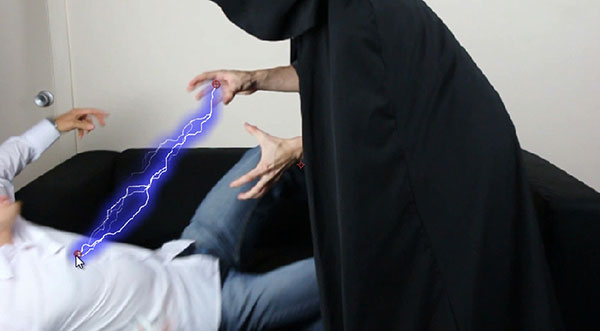
Note that the lightning effect does not animate by default when you scrub through your footage.
It will change when you move the Origin and Direction markers around, but we would like our lightning to constantly twist and jerk around like a real life sustained lightning would.
Animating the lightning using After Effects expressions
For this we will use a super simple expression!
Click on the stopwatch next to the Conductivity State property while holding down the ALT key on your keyboard.
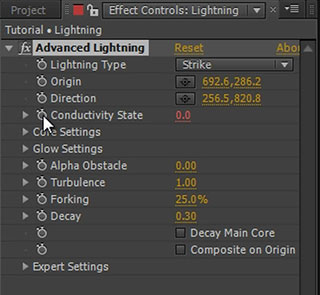
A small text field editor will open up in your timeline window. In this field simply type ‘time’ and then click anywhere outside of the text editor to apply the expression to the Conductivity State property.

This expression will update the Conductivity State of the Advanced Lightning effect every frame to the current time value in the composition in seconds. If we scrub through the composition, the lightning should animate nicely even if you don’t change the Origin or Direction markers.

We will be adding multiple lightning strikes to our solid layer, so I want each individual lightning to be a little less detailed.
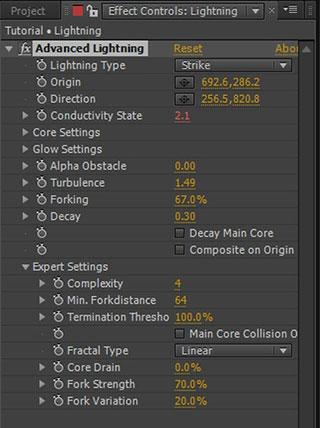
Open up the Expert Settings tab in the Advanced Lightning effect. Lower the Complexity to 4. The lightning should now be single stroke with an occasional branch or two.
Increase the Turbulence to around 1.5 and the Forking to around 70% to add just a few more branches back into the lightning effect.
Now go to the time position where you want your lightning effect to start, grab the left side of the solid layer and trim it down so the lightning activates at the moment when Jimmy unleashes his wrath onto me.

Go to the Advanced Lightning effect and enable keyframing for the Origin and Direction properties by clicking on the little stopwatch icons next to the properties. Move the Origin and Direction markers to Jimmy’s hand and my chest respectively.
Move forward in time a few frames. Move the Origin and Direction markers to match Jimmy’s hands and the position of my upper body.
Continue animating the markers all the way throughout the composition. Don’t worry if the lightning overlaps Jimmy’s hands or my body, we will fix that up a bit later.

If you now scrub through your footage, the lightning should be positioned nicely and continue zap from Jimmy’s hands to me.
To make the lightning effect look a bit better, change the Blend Mode of the Lightning solid layer to ‘Add’. If you cannot see this column, you may have to click on the ‘Toggle Switches/Modes’ button at the very bottom of the screen.
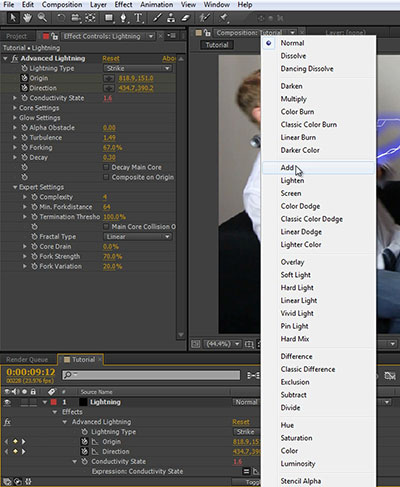
The lightning should look much more electric and …. glowy :D
Adding multiple lightning effects
Let’s make this effect even more awesome!
Select the Advanced Lightning effect and duplicate it by pressing Ctrl+D (Command-D on a Mac).
This will add another copy of the Advanced Lightning effect to the layer.
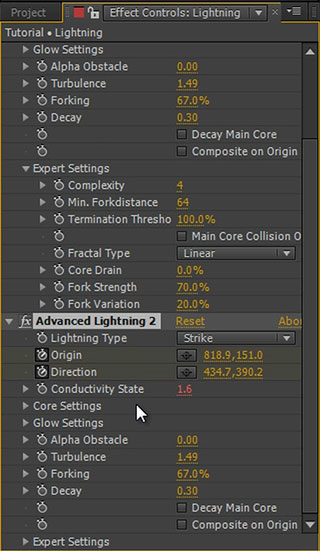
You may notice that we can only see a single lightning effect. Where did the other one go? It gets overwritten by the second Advanced Lightning and the way to get it back is to tick the Composite on Original check box of the copied effect. This will apply the first lightning and then composite the second one on top of the first.
If you reveal all keyframes on the Lightning layer (select it and press U) you will notice that there are keyframes for both lightning effects as they have been duplicated as well.

Select the copy of the effect and change the start and end markers a little bit for all existing keyframes. We will add 2 lightning strikes to each hand, so just move them slightly.

Make yet another copy of the Advanced Lightning effect. Make sure you duplicate the copy we created as it is already set to ‘Composite on Original’. Otherwise all other lightning effects will vanish from the layer.
Move the Origin and Direction markers to Jimmy’s left hand and to my abdomen. Because this lightning is a little bit closer to the camera and elements closer to the camera should appear larger, pop open the Core Settings and increase the Core Radius to 3. This will make this copy of the effect just a little bit thicker to emulate it being closer to the camera.
Again, animate the Origin and Direction markers all the way through the composition. It might make it easier if you delete all existing keyframes so it doesn’t constantly snap back to Jimmy’s right hand.
Create yet another copy of the Advanced Lightning effect and move it slightly so Jimmy ends up with 2 lightnings coming out of each hand and striking at different spots of my upper body.
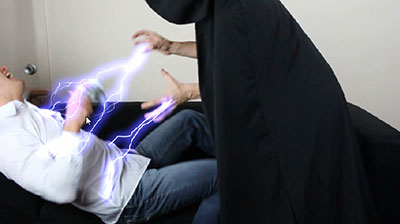
Hide all the keyframes by clicking the little twisty on the solid layer and play back the effect.
Looks pretty good so far, but we do not want the lightning to sit on top of Jimmy’s hands and my right arm. The lightning should sit behind those elements.
For this, we will use simple subtractive masks. Note that if you select the solid layer and try to apply a mask, nothing will happen because the lightning effect is generated after the masks are applied.
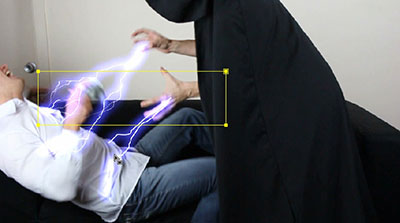
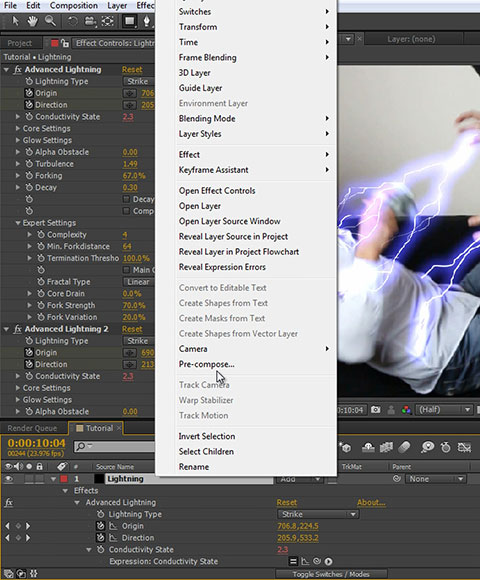
To get around this issue we need to pre-compose the solid layer so that all the lightning effects are applied before we add any masks. Right click on the layer and select Pre-compose from the context menu.
I will call this composition ‘Lightning Comp’. It is important that you select the ‘Move all attributes into the new composition’ option so the lightning effects get nested properly and we can apply masks to them. Then hit OK.
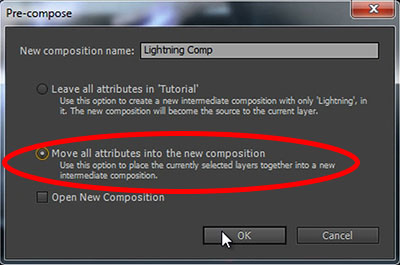
The blend mode of the new composition will default to Normal so set it back to ‘Add’.

We should be back where we started with the one key difference being that we can now apply masks to the Lightning Comp layer and it will apply to the lightning strikes as expected.

Select the Ellipse tool and draw a circle around Jimmy’s right hand. You can hold down the shift and control keys to keep the new mask perfect circular and center it at the position where you clicked with your mouse.
Set the mode for the mask to Subtract to cut it out of the Lightning Comp layer. Open the mask properties by pressing ‘mm’ and increase the Mask Feather amount to around 50 to blend the mask nicely into the scene.
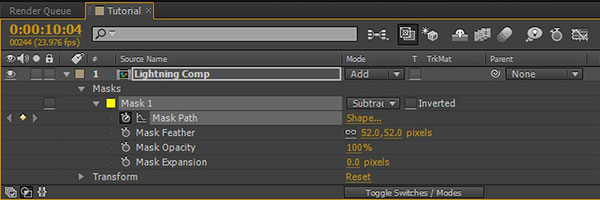
Because we want the mask to follow along with Jimmy’s hand, also enable keyframes for the Mask Path by clicking on the stopwatch icon next to the property.
Go to the time position where the lightning first shoots out of Jimmy’s hands and move the mask into position. You can double click on the edge of the mask to select its shape and move it around.
Just like with the lightnings, move through your composition and match the position of the mask up with Jimmy’s hand as it moves around.

Return to the moment where I get fried, select the mask and duplicate it using the same Control+D keyboard shortcut we used many times already in this tutorial. Move the copy of the mask to Jimmy’s left hand and animate it to follow the hand for the duration of the composition.
Back to the start, select the pen tool and draw a mask around my right arm. It doesn’t have to perfect, the effect is pretty quick. Set the mask mode to Subtract and increase the feather amount to around 12. Animate the mask path to follow my arm until I fall off the screen to keep the lightning effect behind my arm.
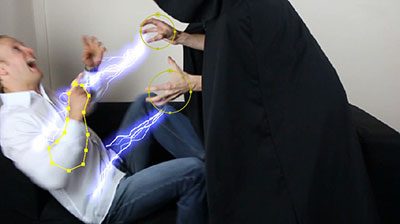
If you play back your composition now, the lightning should appear to be coming out of Jimmy’s hand and strike me in the chest, being properly obscured by my right arm.

Adding lighting to the lightning
The last thing we need to do is add some nice lighting effects!
For this, duplicate the base footage – you know the short cut by now – and rename the copy to ‘Lighting’. You can rename any layer by selecting it and pressing the Enter key.
Drag the Lighting layer to the very top and change the blend mode to Add.

The lighting will likely be much too strong, but we’ll fix that in a moment. For now, move to the time position where Jimmy let’s out his Emperor rage, and trim the Lighting layer down to start at the correct moment. Since the lightning would cast a blue-ish light, let’s apply a Tint effect to the layer.
Change the Map White To property to a bright lightning-like blue.
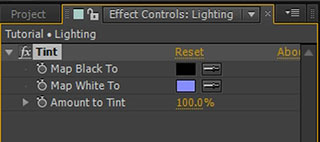
It will still be too bright, but the colour should match your scene a lot better!
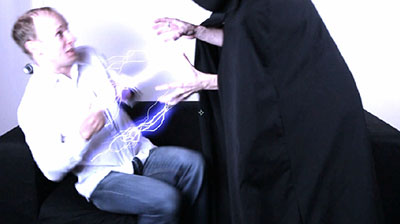
Apply a large round mask around the main area where the lightning is and increase the feathering amount to something large like 300.
Animate the mask to roughly follow the electricity shooting out of Jimmy’s hands.
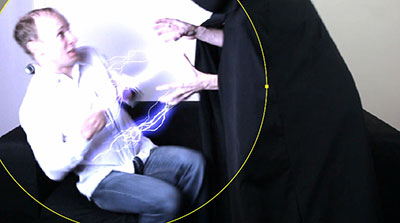
Create yet another mask on the layer around Jimmy’s side facing the lightning effect as it would receive a lot of light.
Again, feather it out a little and animate the path to follow along with the footage.
There should now be a fairly even glow around the lightning strike and a distinct highlight on the left side of Jimmy, adding to the realism of the fake lighting effect :)
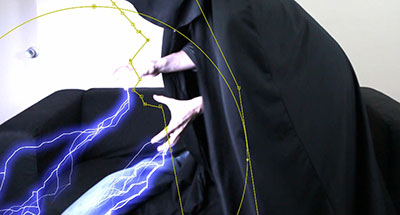
Finally, let’s make the lighting all jerky, like what you’d expect from a large amount of electricity being dischargedd. Reveal the opacity property of the Lighting layer by pressing ‘t’ on your keyboard. Alt-click on the stopwatch icon and in the expression editor that appears in your timeline, type ‘wiggle(10, 60)’.

This will cause the property to jitter 10 times a second by up to 60. Finally, reduce the opacity value of the layer to around 40.
If you play back your composition now, you should have a nice intense lightning hands effect that you can unleaseh onto your friends!


6 Responses
i m happy to find this great site… i m new in after effect ur tutorials are awsome and help me alot thanx for the tutorial
it ll be helpfull if u provide raw footages for practice…:D
Thank you very much! Glad you’re enjoying my tutorials. As for the raw footage, it’s something I’ve been wanting to do, but haven’t gotten around to it yet – I also need to find the best place to upload/share the footage through.
It ws very helpful thnks man… ;) :)
sir maybe you can also upload the footage that youre using. so we can use it too :) hahaha. and follow your tutorial more easily :)
That’s an item on my to do list I haven’t gotten around to yet. But I will hopefully get around to it soon :)
never know we got a great site like this went for editing school but I got nothing out of there….. long live this site and all core members God bless