A little over 2 weeks ago, I uploaded a 3D integration VFX teaser onto YouTube. I have created a full 2 part tutorial showing you how to set up a 3d particle system in 3ds Max to generate the murder of crows and how to composite the rendered elements in After Effects to finish this cool dissolve VFX.
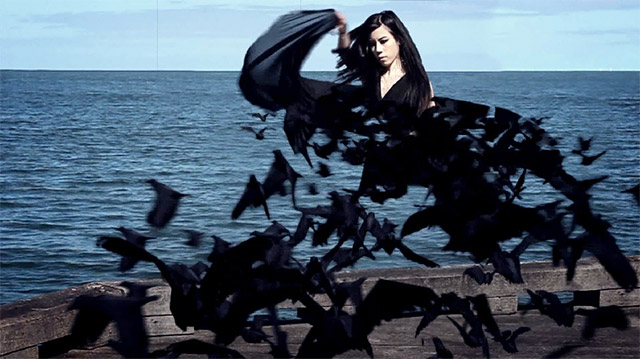
If you have not seen it yet, here is the 3D dissolve to crows effect I created with Fables In Fashion :)
Base Footage
The first thing you want to do is to film your base footage.
My footage is a simple tripod shot of Celina from Fables in Fashion doing a spin at the edge of a pier.

Clean Plate
I was so silly as to forget to take a clean shot of the scene without Celina in it. This was a bad oversight, since I knew I wanted her to dissolve which means I need at least one shot of the empty scene.
So I spent about 2 hours cleaning the footage and removing Celina from the shot using the clone stamp and a number of masked out layers. I also decided to remove some other objects from the scene like the boats and the shadow of the lamp post on the wooden beams.

Note that due to the cloned water, there are a few spots that look a little strange if you look at them closely. However, since the clean shot will only be shown for a few seconds in the final VFX, this is not a big deal.
Celina Rotoscoped
Next, I used the roto brush tool in Adobe After Effects to rotoscope Celina and create a clean video layer with an alpha channel.

Since we will add this overlay on top of our clean plate, the rotoscope does not have to be 100% spot on, just good enough to define Celina’s shape as she is spinning and dissolving into crows.
The next step is to set up and create the crows in 3dsMax!
3d geometry created in 3dsMax
It really does not really matter what 3D program you use for a 3D integration VFX. You can use 3dsMax, Cinema4D or any other program you like but
- It needs to have fairly advanced features like rendering out separate passes for different elements (e.g. shadows, alpha, zDepth, etc) and particle systems
- You need to know how to use those features. Knowing how to render simple shapes is probably not enough
I have used Maya before shortly, but don’t remember much of it, so my weapon of choice for the 3D integration VFX was 3dsMax. My brother Nils who works in the 3D/VFX industry gave me a hand with the trickier bits :)
In 3dsMax I first created simple geometric shapes for the ground and placed a vRay camera in the scene with the same position, angle, focal length, aperture, shutter speed and ISO settings as the camera I used to shoot the scene.

I made sure that the geometry, once rendered, would fit nicely over the geometry (the pier) in the shot when being composited in After Effects. Test this first! It sucks if you find out when you try to finish your VFX that things don’t fit as expected!
Building a birth texture for 3dsMax
Here comes (the first) tricky part.
I want crows to come out of Celina’s shape as she spins. I decided against having them shoot out of her entire body as I wanted to utilise the spin and have the crows emerge from her legs first, then her body, then her head just as she completes the motion.
This means I need to spawn the particles over time, from bottom to top of Celina’s shape as she performs the spin. For this, I needed to create an animated texture that defines the areas where the particles spawn to be used in 3dsMax.
First, I added a Colorama effect to my rotoscoped layer of Celina and rendered it out in black and white:
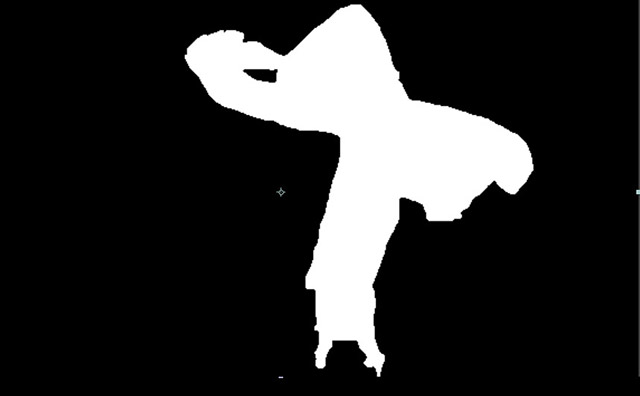
Next, I animated a mask to move from bottom to top over the layer and rendered out the animation. It looks like a horizontal window is moving up the shot as Celina’s white outline does a spin :)

3D Crow Model
My brother Nils once created a dissolve to crows effect for one of his short films and he was nice enough to let me use his awesome animated crow model for my particles :)
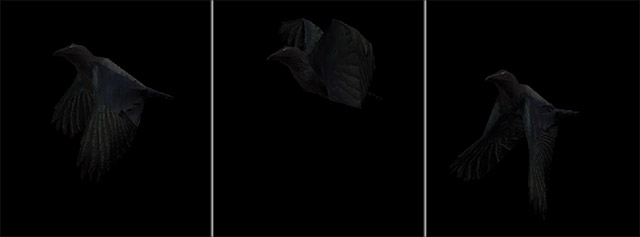
pFlow and birth texture setup
In 3dsMax I created a standard pFlow. If you do not know what that is, ‘pFlow’ is a particle system in 3dsMax. I set up a plane exactly where Celina was standing at the pier and assigned the animated birth texture to it.
I replaced the birth event in my particle flow with a Birth Texture operator and set up the particle to be emitted from the white areas of my animated birth texture. Next I added a Shape event and assigned the crow model to my particles. You will have to set up a few other things like animations, facing, randomness, etc to have the crows spawn (fairly) realistically out of the animated texture.

vRay shadow catcher material
Here comes the (second) tricky part!
We want to render out the crows. We also want to render out the shadows they cast, however we do NOT want to render the ground. Since I used the vRay renderer inside 3dsMax, I created a material that would not be visible but catch and render only the shadows of any objects in the scene.
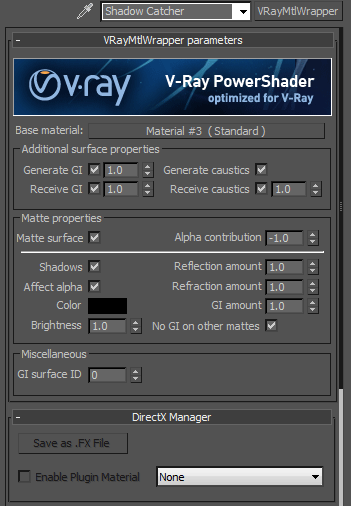
In vRay, you can create a vRayWrapperMtl and then assign a standard material as the base material.
- Select the Matte Surface option
- Set the Alpha Contribution to -1. This will cause the alpha channel to be wiped and thus any objects that fall behind the ground (e.g. crows that are obscured by the pier) won’t get rendered :)
- Tick the Shadows and Affect Alpha options and you’re ready to go!
I set up a standard directional light in my scene to immitate the sun from the actual live shoot. I do not like the vRaySun much as it tries to do too many things for you automatically like changing the colour of light with the angle. I then rendered out my crows :)

Note that while you can see the ground in this example, in the final render using my vRayWrapperMtl, the ground will be invisible, but the crows’ shadows would be rendered with their correct alpha value.
zDepth layer
One more thing I rendered out (and I like to because it usally proves useful for creating 3D integration VFX) is a zDepth pass. This is a pass that renders a greyscale image coloured by how far objects are from your camera.
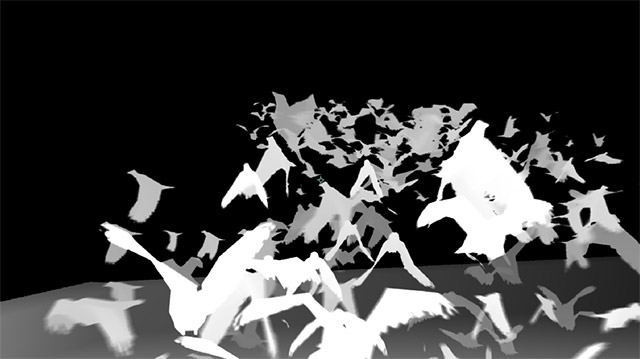
The further away from the camera something is, the darker it will be. This layer can be useful for a number of things when you composite your VFX in After Effects. You can use it to add and blend stock footage elements into your scene using zDepth compositing or you can use it for depth of field or other special effects :)
I used Render Elements provided by vRay to render this pass out separately.
Now it’s time to return to Adobe After Effects to composite our original footage with the rendered layers to create the final dissolve into crows effect!
Dissolving Celina
I now imported my rendered crows as well as my additional zDepth layer back into After Effects to composite my 3D integration VFX.
The first thing I did was to create an animation where I used the crows layer as a matte to have Celina dissolve as they are being spawned.

I offset this layer in time a little bit from the actual rendered crows so it looked like Celina was breaking up or fraying out as the crows were spawned out of her body.
To increase the effect of crows emerging from Celina, I added another layer of the rendered crows, set it to multiply and again, offset it in time a little bit.
This caused dark crow shadows to appear just before crow shaped pieces disappeared from Celina’s body from bottom to top, increasing the impression that the crows were emerging out of her.
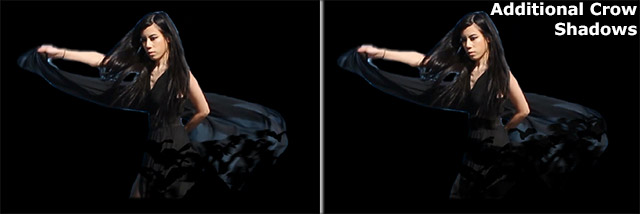
Compositing the rendered crows
Next I simply added the rendered crows layer on top of the dissolving Celina layer. I was quite happy with the result as the transition from crow shadow to fraying out to actual crow seemed nice and seamless :)

Note that I only added the ground in so you guys can see the shadows. In my final crow render, as I mentioned before, only the shadows are rendered in my crows VFX layer :)
Compositing onto clean plate
I then added Celina onto the clean plate I created earlier. I also added a large, soft shadow under the entire murder of crows because the individual crow shadows didn’t seem to darken the ground sufficiently for such a large number of birds!

I used my zDepth layer to add some depth of field to the crows using the Frischluft Depth of Field plug-in. It basically allows me to use a zDepth layer and determine which depth is in focus and how shallow my depth of field will be :)
Colour grading and Styling
The final step to a completed 3D integration VFX was to add some colour grading and style to the video.
I wanted to go for a rough, twitchy and disquieting look and so I drained quite a bit of colour, increased the blue, added some scratches & noise and used my favourite Twitch plug-in from VideoCopilot to create twitchy moments in conjunction with some time remapping :)
Add some music to taste and your 3D integration VFX is complete :)
I am actively working on the first part of my 3D integration VFX tutorial and hope to have it out within a week :)


4 Responses
Excellent! Great work, and Thank you :) !
Very nice one special because you combine 3ds max with after effects! Excellent work cant wait to see the tutorial and the progress work.
not bad.
Keep up the good work buddy!!!!!!!!!!