In today’s exciting Adobe After Effects basics tutorial will cover Track Mattes!
In my last basic tutorials I covered masking and Adjustment Layers so go check them out if you haven’t yet :)
Once you know all about masking and adjustment layers, you are ready to move on to Track Mattes!
What are Track Mattes?
A track matte is an invisible layer that is used to control the opacity of the layer directly beneath it. In essence, they replace the alpha channel of the layer they are being applied to.
Let’s assume you have 2 layers of footage on top of each other. The top layer will, if its opacity is set to 100% and you have not applied any masks, obscure the layer below it entirely.
However, you can add a track matte to the top layer to control its opacity. First, you will need to add a new layer directly on top of the layer you want to use it as a matte for. This layer can be anything you want: text, shapes, a video or another composition. In the following example I simply added a few shapes onto my new layer:
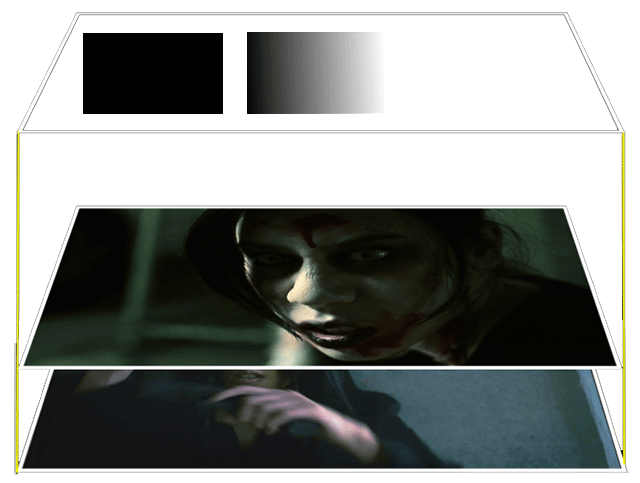
The next thing you will have to do is go to your ‘TrkMat’ column in the layer properties window and enable the track matte on the layer below your matte. If you cannot see this column, you may have to click on the ‘Toggle Mode/Switches’ button at the bottom of the screen. Or you can hit F4 on the keyboard :)
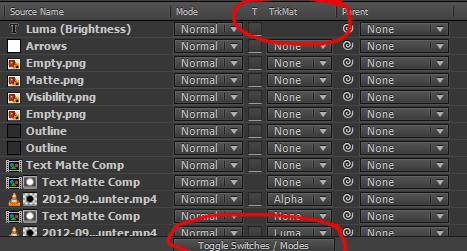
The column shows a combo box with a number of options for the track matte:
- Alpha Matte
- Alpha Inverted Matte
- Luma Matte
- Luma Inverted Matte

I will discuss all these options below, but for now just note that you need to set the track matte option on the layer below your track matte layer. This will turn the layer above it into a track matte and automatically make it invisible (because in the most cases you do not want to see your track matte).
Now let’s look at the different type of track mattes in Adobe After Effects.
Alpha Matte
When you select ‘Alpha Matte’, the alpha of your track matte will control the alpha of your layer. The alpha channel from the matte layer is essentially being fed into the alpha channel of the layer so wherever your matte is invisible, your layer will be as well :)
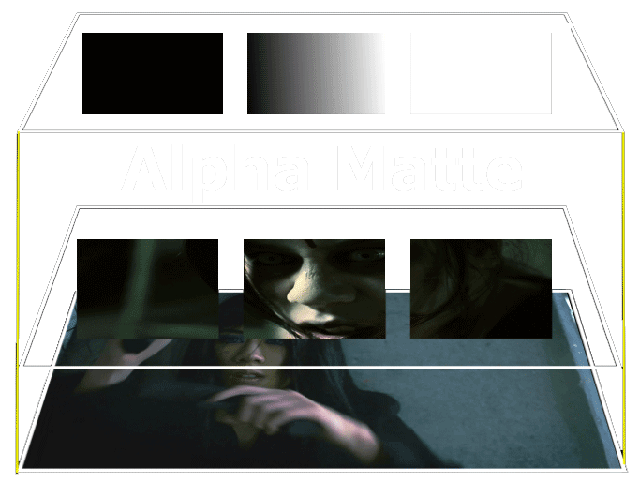
Note that this also works with semi transparency. If your track matte layer has some parts where it’s only 50% visible, the layer you applied it to will also only be 50% visible in those areas.
Alpha Inverted Matte
This option works exactly opposite to the Alpha Matte option. Wherever your track matte is invisible, your layer will be visible.
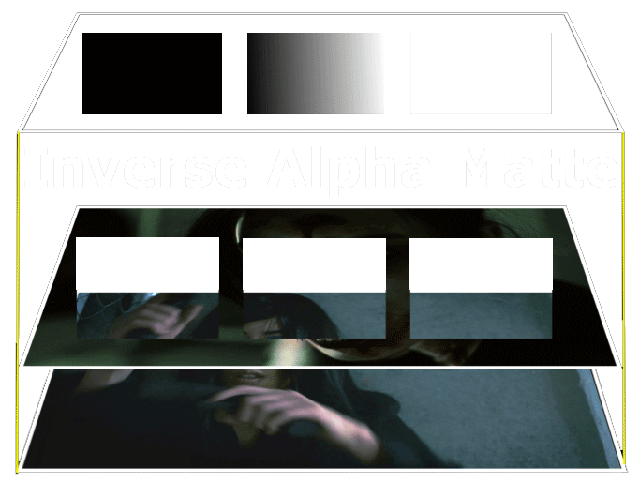
Again, this also applies to semi transparency, but wherever your track matte layer is 30% visible, your layer will become 70% visible.
Luma Matte
‘Luma’ is just another word for brightness. This option will use the brightness of your track matte to define the opacity of your layer. Where the matte is white, your layer will be visible. Where your matte is black (or invisible, as invisible is treated like black with this option), the layer will be invisible.
Note that colours between black and white will result in semi transparent areas in the layer you apply the track matte to :)
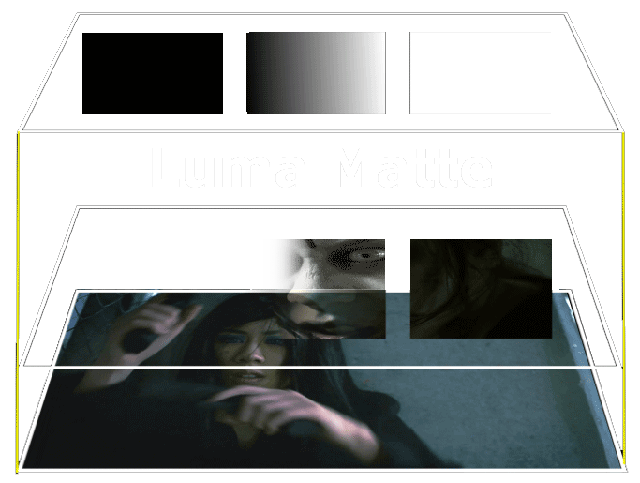
Combining luma mattes with adjustment layers, you can create great fake lighting effects for muzzle flashes and explosions :)
Luma Inverted Matte
This option does the opposite of the luma matte option. Black in your matte defines visible areas and white defines invisible areas.
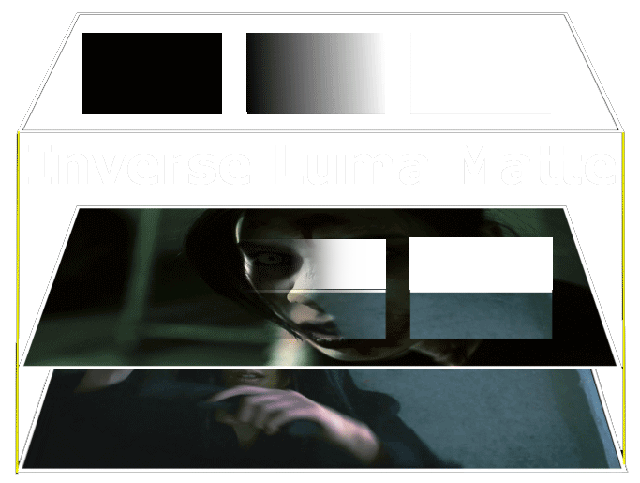
Let’s look at some advanced usages for track mattes in Adobe After Effects!
Advanced Track Matte Usage
There are a few cool things you can do with track mattes! For one, you can animate your track mattes to your liking (or use a piece of video footage for it) and the effect will change accordingly throughout your animation :)
In this example, I have animated the square mask on my track matte layer to move from left to right. Note how the opacity of the middle layer changes accordingly!

However, the biggest power of track mattes in my opinion is that they can be applied to adjustment layers to define which areas of the adjustment layer, and thus any effects you assign to it, are visible. This opens up a myriad of possibilities to create complex effects based on dynamic elements in your scene :)
For example, assume you want to desaturate everything in your scene, except one element. I have a shot here of Celina from Fables In Fashion and I wanted to desaturate everything except the rose.

Now one option would be to duplicate the layer, manually cut out the rose with an animated mask – it’s a painful task – and desaturate the entire bottom layer. However, we can use adjustment layers combined with track mattes to make this a lot easier and more flexible :)
We can add an adjustment layer on top of the footage and desaturate the entire scene. We then duplicate the base footage and turn it into a matte for the adjustment layer.
For this we can use a linear colour key effect to only select the red parts of our shot. After a few small cleanups, you will get a layer that is only white where the red of the rose is.

Applying this layer as a Luma Inverted track matte will make our adjustment layer invisible wherever the layer is white, e.g. exactly where the rose sits in the footage.

And because the adjustment layer desaturates everything beneath it except the areas where it is transparent, everything except the rose will become desaturated :)

The great thing about this option is that we could edit or change the footage and the effect would work the same. If we used a mask, we’d have a lot of work in front of us to adjust the animated mask paths!
I hope this tutorial has given you a first glance at the great power of track mattes in Adobe After Effects :)
Have fun experimenting!


17 Responses
Great work, mate. I had some questions and now they are all gone thanks to your wonderfully explained article
Thank you very much! Great to hear you got some useful information out of the tutorial :)
Thank you so much for this tutorial.
I was confused with the concept of Luma and Alpha
for quite a while, your tutorial just explains everything
I need to know. Thanks again. Great tutorial. Love it.
Glad you enjoyed the tutorial and that you got something useful out of it :)
This was great. Very well explained – thanks!
Great concise explanation, this site is terrific.
Thank you so much for this tut – cleared things up for me, I am printing this out and hanging on my wall :-)
Glad to hear you found the tutorial helpful!
you can send for me footage in example, please!
Oh man…how have I not come accross your site before!..your tutorials are so great! Thanks for taking the time to make them for us :)
Justin
Thank you very much Justin! Great to hear you’re enjoying my tutorials!
I really appreciate the energy you put into your tutorials. They are fun to watch. Thanks.
thanq so much
Great, Tobias!
still don’t understand a diff between semi transparent luma vs semi transparent alpha …
same result..
Try comparing a fully black or fully white matte or a checkerboard image or something with a distinct pattern so you can clearly see the different :) Luma Mattes and Alpha Mattes work very differently
Could you please add such images/examples to the article ? I don’t have a possibility to use AE, but I would like to understand how it works..