In my 5 part 3D integration VFX series I showed you how to plan, shoot, track, render and composite 3D elements into your scene using After Effects and 3dsMax. If you do not need all the featured offered by a fully fledged 3D program, you can also create cool 3D integration effects using the Element 3D plug-in by videocopilot. This tutorial will show you how :)
Base Footage
Here is a very simple clip of me pretending to interact with a floating alien object. It is a simple static shot (camera was on a tripod) and I just pretend to try to touch it and then when it floats away I chase after it.

The Element 3D Plug-In
We will use the Element 3D plug-in by videocopilot to add a 3D blob into the scene and animate it so it looks like I am actually interacting with it. Element 3D is a plug-in that lets you set up and animate 3D objects directly in After Effects without the need for an external 3D program. While it is limited in terms of what you can do with it (compared to a full 3D software package like 3dsMax or Cinema 4D), it has enough functionality to allow you to create awesome 3D integration effects very easily.
To use the Element 3D plug-in, create a new layer in your scene and apply the Element effect to it. Next, we need to set up the effect and define the 3D objects we want to use. For this, click on the ‘Scene Setup’ button in the Element effect parameters.
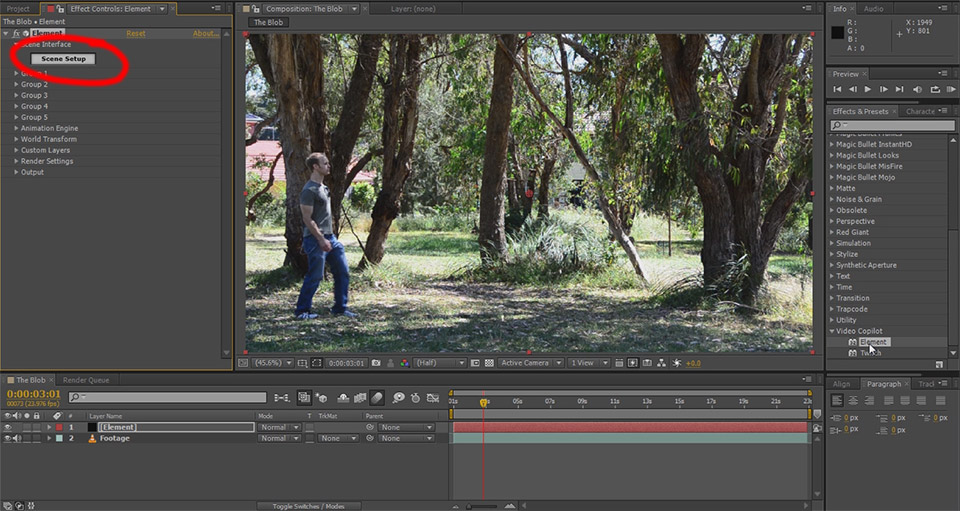
Now let’s go over the details of the Element 3D user interface!
The Element 3D User Interface
When you click on the ‘Scene Setup’ in the effect parameters, the Element 3D user interface will open. This window is where you can select the 3D objects you want to use, define and adjust their materials and preview your setup in a number of different ways.
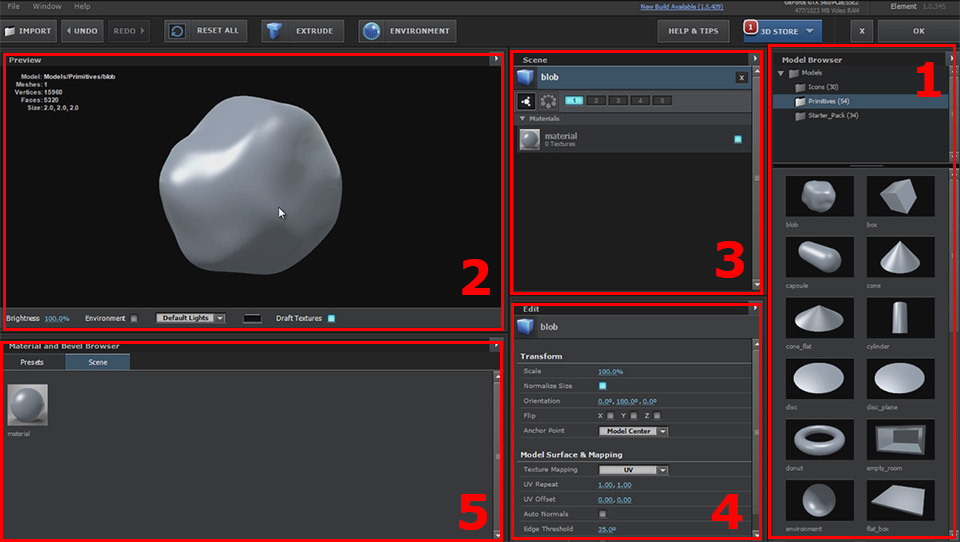
1. The Model Browser
The Model Browser gives you access to all the models (OBJ files) that you have on your hard drive. Element 3D comes with a number of primitives and objects that you can use. Alternatively you can model your own or purchase an additional model pack add-on.
The Model Browser is used to select the 3D objects you want to have in your scene.
2. The Preview Window
The Preview Window simply shows you what the currently selected object looks like with its current material settings. You can set up different environment maps and lighting configurations to check out your 3D objects in different scenarios.
3. Scene Settings Window
Here is the truth about Element 3D: Element 3D is a primarily a Particle Replicator, meaning it is used to display and control large number of 3D elements. It isn’t used to ‘spawn’ particles or animate 3D objects, though to some degree you can fake it.
The Scene Settings window allows you to define which 3D objects are used in the scene and which control group they belong to.
4. Object Properties Window
Here is where you can change all properties of the currently selected object and tweak any material settings for the active object material.
5. Material and Bevel Browser
Materials are used to defines the look of the surface of your 3D object. Element 3D contains a large number of materials for you to use, but as always you can download add-on packs if you want more options. This window lets you choose and assign different materials to the 3D objects in your scene. For text you can also assign different 3D bevel styles using the Material and Bevel browser window.
Setting up The Blob
Select the ‘blob’ model in the primitives folder of Model Browser to add it to your scene. Next, to add some more realism to the effect, we want the blob to reflect the scene that we are adding it into. For this assign a chrome (or otherwise highly reflective) material to your blob.
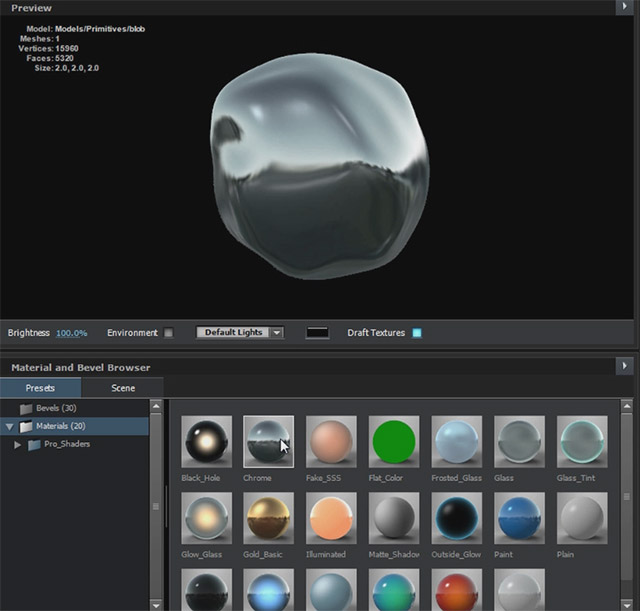
Next, and this is important, we need to set up our environment texture. Remember that we captured a sphere map when we were shooting the scene for this 3D integration VFX? Now this sphere map will come in handy!
Click on the ‘Environment’ button at the top of the Element 3D window. In the Texture Channel window that opens up, search for and select the sphere map you took on set when you filmed your base footage. This should not be a simple image, it needs to be a sphere map for it to be properly reflected by the 3D object we set up. This is what it looks like for me after I selected my sphere map image as environment map.
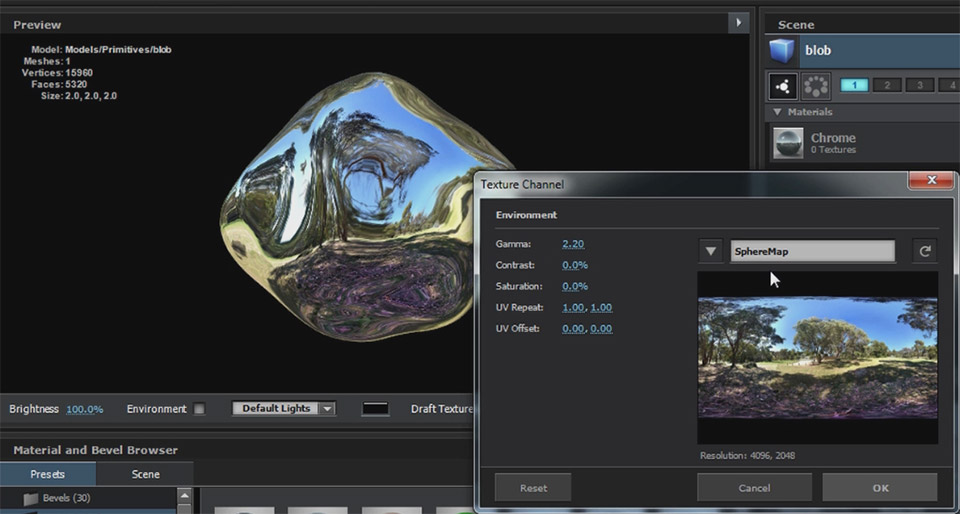
This is it for setting up the blob object. Hit ‘OK’ on the Element 3D window to return to After Effects. This might look different depending on how you set up your object in Element 3D.
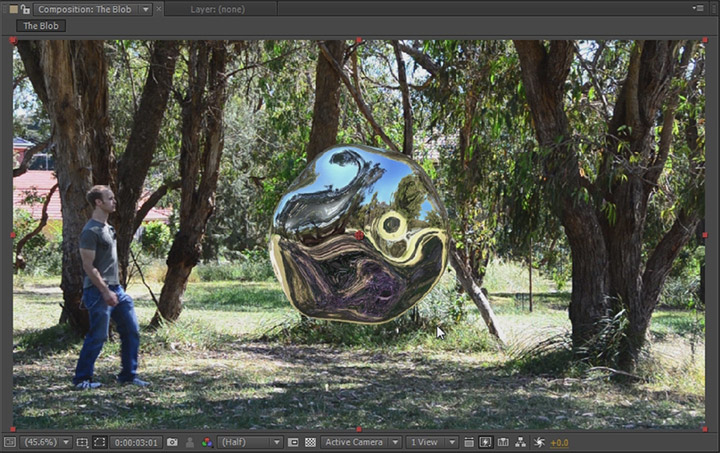
Now it’s time to get our 3D object properly positioned in and matched up with our scene!
Positioning and animating the elements in your scene
Next we need to set up the camera to be properly positioned in relation to the 3D blob object we just added into the scene. For this, create a new camera. Ensure that the settings of this camera match exactly with the settings of the physical camera you used to film your scene. My camera was a 35mm lens so I will ensure that I select a focal length of 35mm.
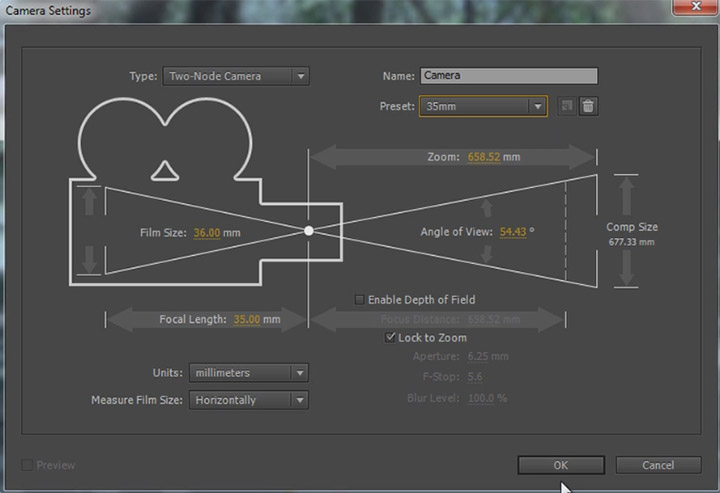
Position the camera relative to the blob 3D object in your scene. We want the blob object to sit nicely in our composition and have the correct scale and position to make it look realistic. Feel free to open up the Group 1 (or whichever control group you assigned your object to) settings of the Element 3D effect and tweak the position of the Particle Replicator to tweak where the blob is visible.
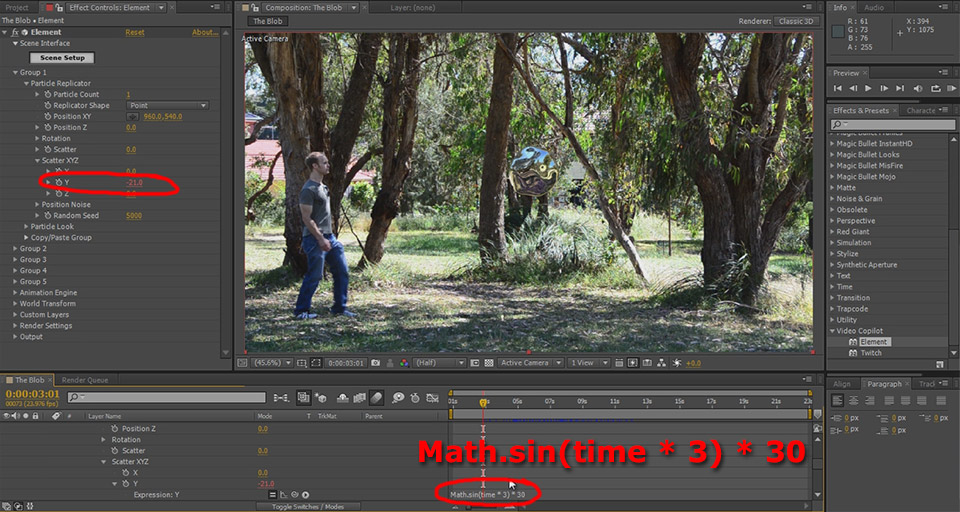
I want the blob to slowly bob up and down to make it look like it is actually alive and for this, I will use a simple expression. Alt-click on the stopwatch icon next to the Scatter Y property of the Particle Generator for Element 3D. In the expression editor that opens up type: Math.sin(time * 3) * 30
This expression might look complicated but all it does it to apply a sine wave with a max/min of 30/-30 and around a cycle every 2 seconds to the scatter Y property of the Particle Replicator.
Now with the bobbing motion of the 3D blob taken care of, we can animate its position (XY, Z) to match in with our scene. In my case, I animated the blob to follow me around, but evade me trying to touch it by zipping around me towards my other side. All you need to do for this is add keyframes until you’re happy with the movement :)
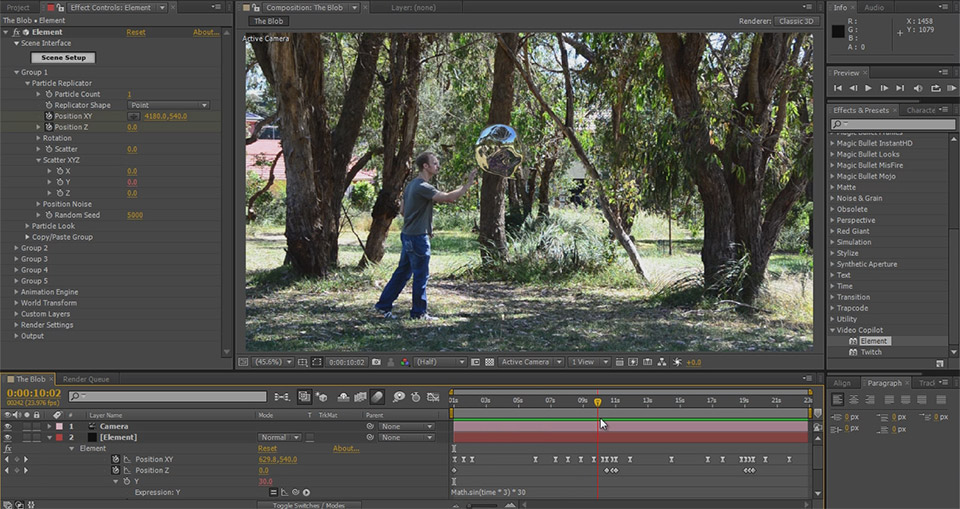
Don’t forget to enable motion blur on the Element 3D layer so that any fast movement of your 3D object looks realistic.
Adding a Glow effect to the blob
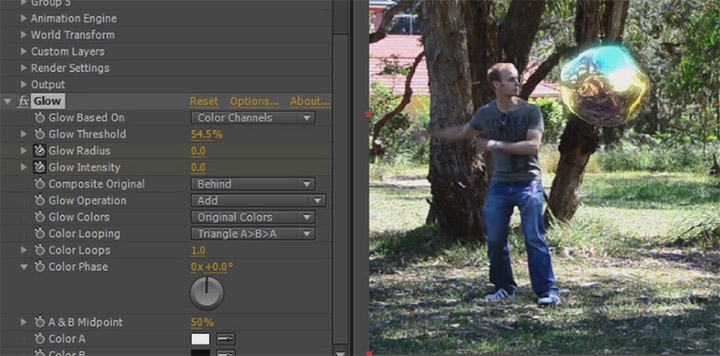
To give the blob a little bit more life, I decided to add a Glow effect to the blob that would activate whenever I am about to touch it and it gets scared and evades me. So I added a simple Glow to the Element 3D layer and animated the Glow Radius and Glow Intensity to match up with the moments when the blob was escaping my attempts to touch it directly.
Of course this step is totally optional and you should feel free to add whatever other effects you feel are suitable to achieve the scene you are trying to create.
Giving the blob a shadow
Before we wrap up the blob 3D integration, let’s add one more crucial element to the scene: a shadow for the blob. How you achieve this will depend a little bit on the shot you are working with. For me, light is coming down from the sun at an angle of around 30 degrees so we should definitely be seeing a shadow for our blob.
A simple way to achieve this is to duplicate the Element 3D layer, turn the layer into a 3D layer and rotate it around until the blob shape is flat on the ground. You can then apply a Hue/Saturation effect to drain all the colour and lightness out of the shadow layer and apply a fast blur to soften it as required.
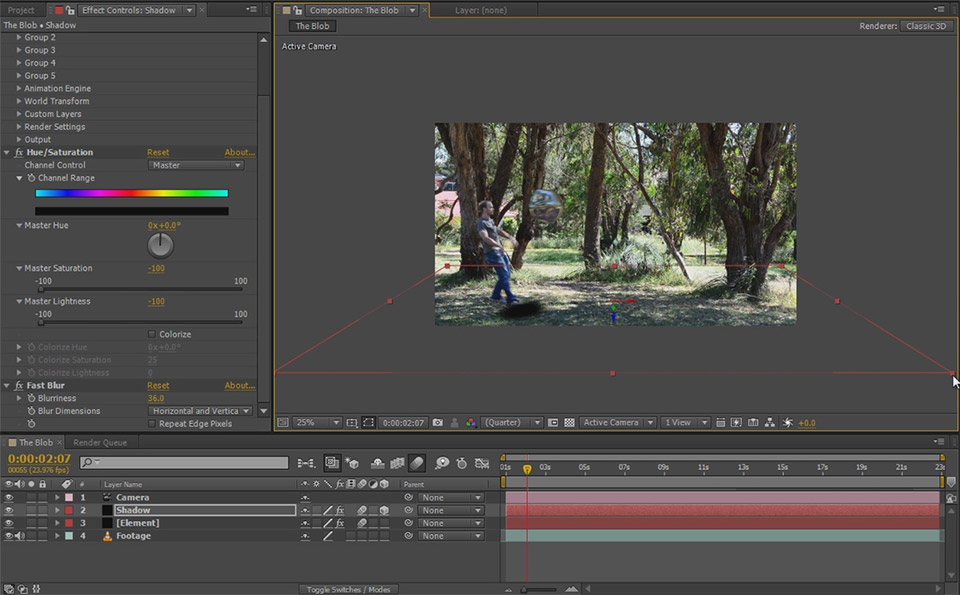
Tweak the shadow opacity to suit your scene and you may consider adding a Curves effect if you need to slightly tint your shadow to blend in a bit more naturally. Here is the final effect with the 3D blob in the scene:

Element 3D is not the best choice for all 3D effects, especially when you need to actually spawn particles, deal with physics or other advanced elements. However, Element 3D is excellent for creating simple and easy 3D integration effects without the hassle of having to track/export your footage, rendering your elements and bringing them all back for a final composite.
Experiment, have fun and I hope you learned something new :)


2 Responses
great tutorial tobias …can you make a little tutorial
how to suck by alian ball or a black hole….in this tutorial ur suck by a alin ball please make a little tutorial
thanx for this all tuts …after vc i found a another great site
I will put it on the request list!