You can easily sync your effects and animations with audio in Adobe After Effects. This can be done by extracting keyframes for the volume of the audio clip and using simple expressions to use these keyframes to drive any effect parameter or layer property you want.
This technique is very easy to do and opens up the possibilities to create amazing music visualisations or simplify a lot of common tasks. For example, I used it to animate the opening/closing mouth for the puppet in my After Effects Puppet Tool tutorial.

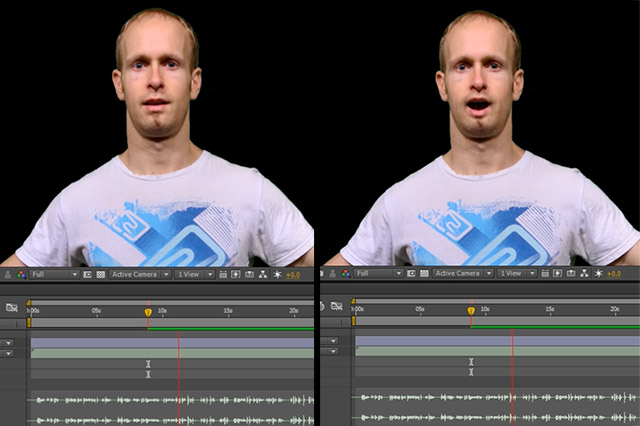
I animated the mouth to open in sync with the audio to make it look like a South Park character talking. I did not want to animate the mouth by hand because it would have been much too tedious and decided to use the Audio to Keyframes conversion in After Effects to make this job a lot easier for me. This tutorial will take you through that process.
Preparing the Puppet Animation
To start off, create a new composition and import the cutout of me that you can download here. Scale it down so it sits nicely in the centre of the screen.

Next, you need an image of an open mouth. I tool a photo of myself with my mouth open and then cut out only the mouth. You can download the image by clicking on this link.
Import the image of the open mouth into your project and place it in your composition, on top of the cutout layer.
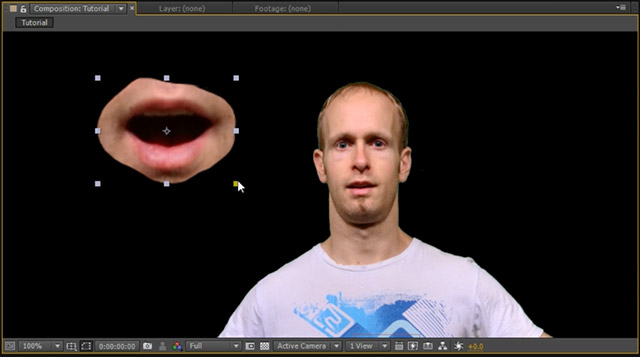
Scale it down and position it so it sits precisely over my closed mouth. If you toggle the visibility of the mouth, it should look as if your puppet was talking.

Notice that the edges of the mouth are fairly harsh. While you can use masks to soften the edges, a much simpler way is to use the Matte Choker effect. Apply the Matte Choker to the open mouth layer and increase the Choke as well as the Geometric Softness to smoothen out the edges a bit more.
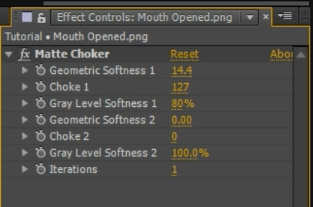
This will blend the mouth more cleaner with the cutout image and instantly look more realistic. Well, as realistic as you get with puppets!

Now it’s time to extract the keyframes from our audio clip!
Extracting Keyframes from Audio
Import an audio clip into the composition. You can use any other audio clip as well, but for this tutorial it would make more sense to have a simple voice audio track of someone talking. When you expand the layer, Adobe After Effects will display the waveform for the audio track.

To convert the volume of this audio layer to keyframes, you can use the Keyframe Assistant. Simply select the audio layer and then go to the main menu and select Animation -> Keyframe Assistant -> Convert Audio to Keyframes.
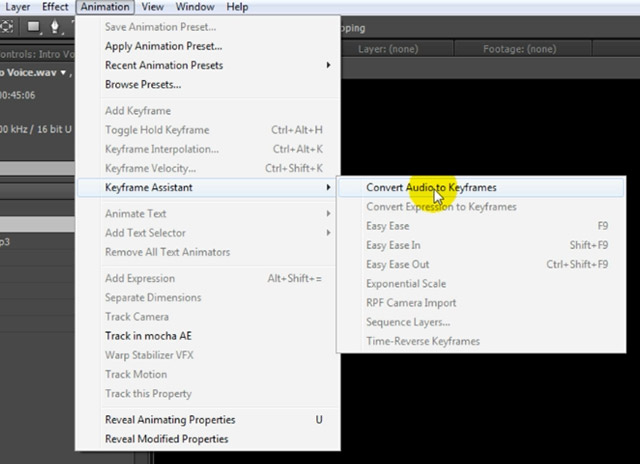
A new Null Object called ‘Audio Amplitude’ will be created in your composition. If you expand the layer you will see 3 sider expression control effects applied to it. Check out my After Effects Expression Controls tutorial if you want to learn what they are for and how to use them.
The 3 slider effects have been keyframed to represent the volume of the left, the right and both channels of the audio layer.

As you know, by themselves, these sliders have no effect on anything in your composition, but we can hook up effect parameters and layer properties to them using expressions. If you’re unfamiliar with expressions, check out my separate Adobe After Effects Expressions tutorial.
Let’s hook the visibility of the open mouth layer up to the Both Channels slider so it only becomes visible whenever the volume of the audio goes above a certain level.
Utilising the Generated Audio Keyframes
We want the open mouth to only be visible whenever the audio level is above a certain level. This will make it appear as if the mouth opens whenever the puppet talk. While this won’t be perfectly natural, it’ll be enough to convey the feeling of the puppet talking.
To determine the volume threshold to control the visibility of the open mouth, scrub through your footage and have a look at the Both Channels slider value during the lows and highs. Select a good average value that indicates that the person is talking. For me, that is around 4.
Since we want to link the value of the Both Channels slider effect to another property in our composition, make sure the Audio Amplitude layer is expanded so you can see the effect and its keyframes. Then reveal the opacity property of the open mouth layer and alt-click on the stopwatch icon to add an expression to it. Then take the pick whip icon on the Opacity property and drag it onto the Both Channels Slider property.
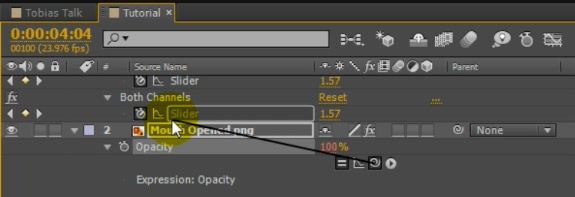
Let go to insert the expression into your text editor for the Opacity of the Mouth Open layer. Your expression should now be
thisComp.layer("Audio Amplitude").effect("Both Channels")("Slider")
This expression will set the opacity of the mouth open layer to the value of the keyframes for the Both Channels slider effect. That is not really what we want. We want the opacity to be fully opaque (100) when the slider value is above our designated volume threshold (4) or 0 otherwise. For this, change your expression to
thisComp.layer("Audio Amplitude").effect("Both Channels")("Slider") > 4 ? 100 : 0
This is a simple terniary expression that says ‘If the value of the Both Channels slider is greater than 4, set the Opacity of the Mouth Open layer to 100, otherwise set it to 0’.
If you now play back your footage, the mouth of the puppet will open every time the audio level goes above 4, giving the expression of the puppet talking. And the greatest thing is that we achieved this without having to manually animate the open mouth to sync it up with the audio.
Other Things to do with Audio To Keyframes Conversion
Remember that you can hook the generated keyframes for your audio layer up to any effect parameter or layer property that you want. This allows you to create great audio visualisationsand can save you large amounts of manual keyframing work.
As another quick example, let’s apply a bulge effect to my head inflates and deflates in sync with the audio. Apply a Buldge effect to the puppet layer and place the Bulge Center right on the face of the puppet.
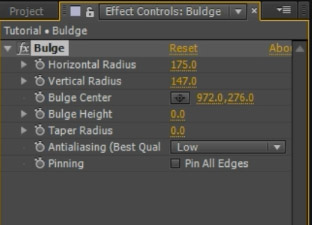
You can control the reach of the effect by altering the Horizontal Radius and Vertical Radius properties and you can change the strength of bulge by increasing or decreasing the Bulge Height property.
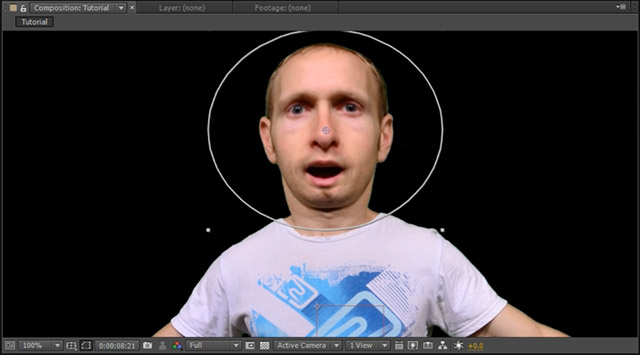
We want to link the Bulge Height property to the Both Channels slider value and you can do that exactly like we did before by using expressions and the pick whip icon. You may have to multiply or divide the expression to scale the bulge height to suit your audio keyframes. Once you have linked the audio keyframes up to the Bulge Height property, your puppet’s head will inflate in sync with the audio!

There’s a million other uses for extracting keyframes from audio in Adobe After Effects and I encourage you to play around with this technique and have some fun!


2 Responses
Thanks man, really clear and very helpful. I always wanted to have a bulking head to the rhythm of head pumping music… of course
Haha, thank you for the comment 😊