Most of my VFX tutorials are aimed at intermediate to advanced users of After Effects. While I also have an ongoing After Effects basic beginner tutorial series, I felt I was missing a tutorial for absolute beginners, for people who are just starting to use After Effects and are trying to create their first own VFX.
If you are totally new to Adobe After Effects, then this tutorial is for you :)
After Effects Basic Beginners Tutorial – How To Create Cool VFX
This blog post is a little longer than usual, but I guarantee that by the end if it you will know how to create VFX with Adobe After Effects or your money back! … yeah, this blog is totally free so there won’t be any money back, but if you do get stuck, I am more than happy to answer any questions you may have – just leave them below :)
The VFX Workflow
Visual effects are created by placing a number of visual elements on top of your footage and compositing all of the layers together into a final result.

In the age of technology and computers, we have software tools called ‘video composition programs’ to help us with this process and Adobe After Effects is on of the main programs currently used in the professional industry.
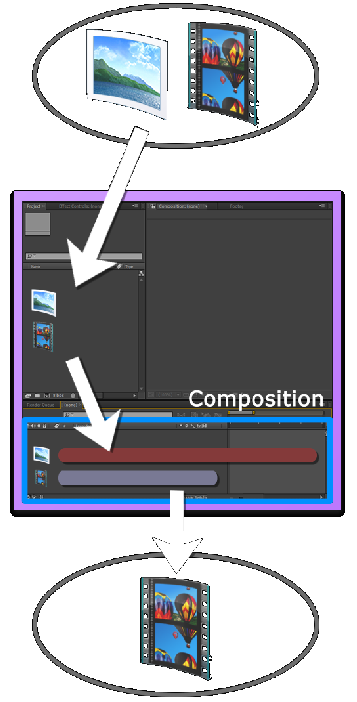
The basic workflow to create a VFX in Adobe After Effects is
- Import your media. This can be any number of media files including video, images and audio
- Create a ‘composition’ and layer your media items into the composition. You can then move the layers around, mask them, change the way they are rendered and apply all sorts of effects to blend them together nicely
- Export the composition into a final output file which will usually be a video, but could also be a still image
Let’s explore the interface of Adobe After Effects!
The Interface of Adobe After Effects
Here is a screenshot of what you will see if you are working on a project in Adobe After Effects. Note that I am using CS6 so depending on your version, the interface may differ slightly.
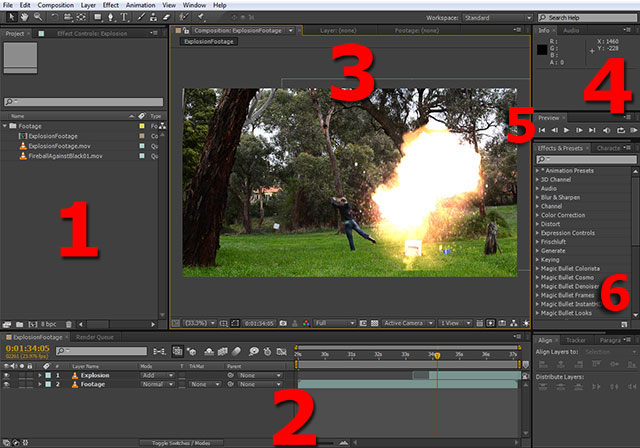
1. The Project Window
The project window will show you a list of all the files you imported into your project as well as any compositions you created. You can create folders here and I do recommend that you keep your files properly organized as it can get pretty messy pretty fast, especially when you work on more complicated VFX.
2. The Timeline
The timeline displays the contents of the current composition you are working on. On the left side you can see all the layers in your composition and this is where you can manage their order and properties. On the right side you will see the life bar for each layer. This bar indicates when the layer starts and ends and you can move them around or adjust their start or end time at will :)
The vertical red line in your timeline window is the current time indicator and you can grab and drag the little triangle head to scrub through your composition.
3. The Preview Window
The preview window in the middle of the screen will show you what your composition looks like at the current time position. As you play back your or scrub through your composition, the preview window will update automatically.
4. Configurable Tool Panels
On the right side of the window you will find a number of tool panels. These can be configured and generally, you can drag any tool panel around and dock it wherever you like to fully customize your After Effects interface.
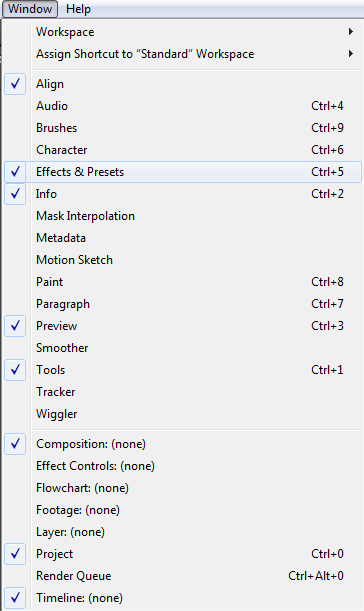
If you accidentally closed a tool panel and you want to get it back, you can simply re-enable it from the Window menu.
5. Playback Controls
One of the important tool panels is the playback panel. You can also use the space key to start or stop playback. On the right side of the playback panel is the RAM preview button.
After Effects does not play back sound by default, but you can play back your composition with sound if you use RAM preview.

6. Effects & Presets
Just below the playback panel you will see one of the most important panels of Adobe After Effects: the almighty Effects & Presets tab. Here you can find all the effects available to you as well as predefined effect templates and I guarantee you will work with this panel for almost any VFX you create.
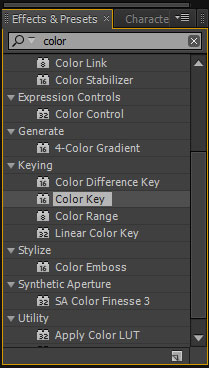
There are a few other panels on the right side of After Effects that you will get to know over time to help you with placing text, alignment, camera tracking and more.
Let’s take all we’ve learnt about the After Effects workflow and interface an create a simple explosion VFX from start to finish.
Creating your first VFX
If you just started up After Effects or created a new project, you will see a blank workspace. The first thing we want to do is import some media so we have something to work with :)
Step 1 – Importing Media
There are 3 ways to import media into After Effects:
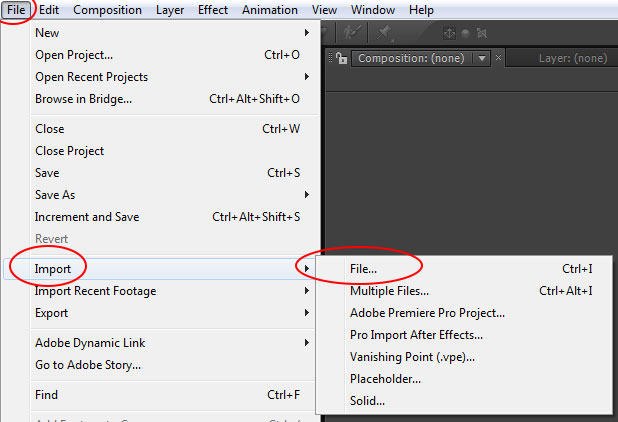
1. You can go to the menu bar and click on File -> Import -> File. A browser dialog will pop up where you can select one or more files you want to import.
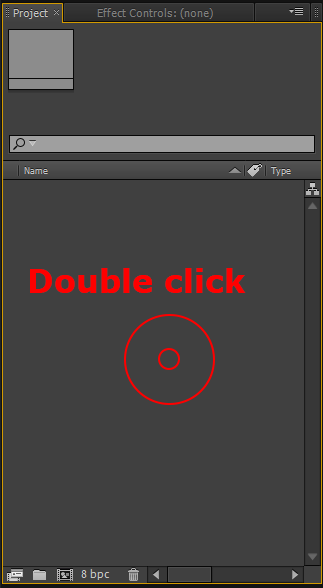
2. You can double click into any empty space in your Project Tab. This will open the same file browser for you to select the desired files to import.
3. You can simply drag and drop any files you want to import from your standard file explorer window directly into the Project tab in Adobe After Effects.
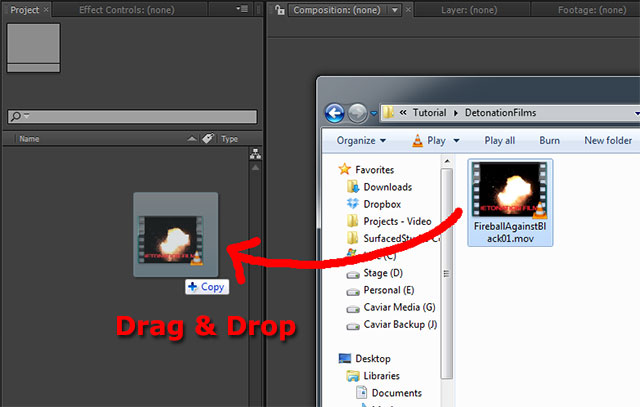
For our first VFX, I am going to import 2 pieces of footage: a shot where I pretend (pretty badly) to be blow away by an explosion and a stock footage element of an explosion.
You can download the explosion stock footage element for free from detonation films :)
Here is a direct link to the explosion footage I used:
Detonation Films – Fireball Against Black
Once both files are imported into our project, you should see them in the Project tab. I have organised them into folders cause I’m a neat freak :D
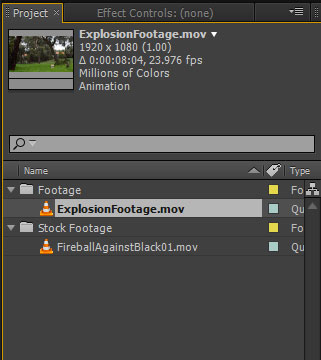
To combine them into a cool explosion VFX we now have to create a composition.
Step 2 – Creating a Composition
Like with everything else, there is more than one way to create a composition inside of Adobe After Effects. To create a new comp, you can select Composition -> New Composition from the menu bar. You can also click on the little ‘Create a new composition’ button at the bottom of your Project tab.

After Effects will pop up a dialog where you can configure the settings of your new composition like name, resolution, pixel aspect ratio, frame rate, duration and much, much more.
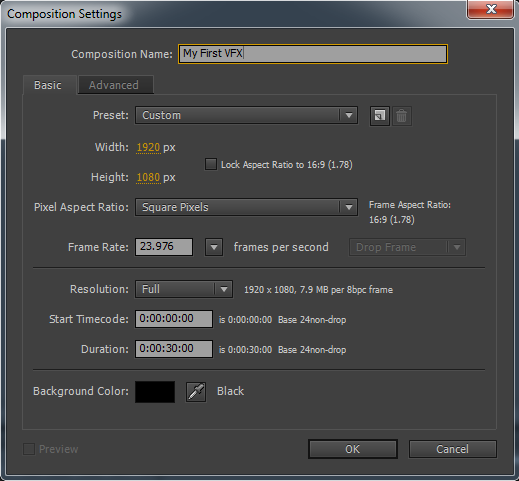
Give your comp a useful name like ‘My First VFX’ so you can easily identify it.
I will leave the resolution at 1080p, the frame rate at 23.976 frames per second and set the duration to 30 seconds to match the base footage I filmed. Once you’re done, click OK to create the composition.
Note that it has been added to your Project Window next to your imported media items.
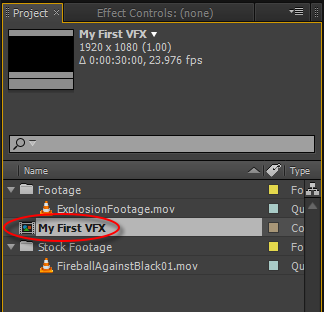
After Effects will also automatically open your new composition in the timeline window. You will see a tab with the name of your composition at the bottom of the screen. This indicates that the ‘My First VFX’ comp is currently open and we’re ready to add layers into it!

Should you accidentally close your composition, you can open it again by locating it in the Project tab and double clicking it.
To add layers into your composition, simply select the visual elements you want from your Projct Tab and drag them into the layer window on the left side of your timeline. I am going to drag my base footage as well as the stock footage explosion into my composition.
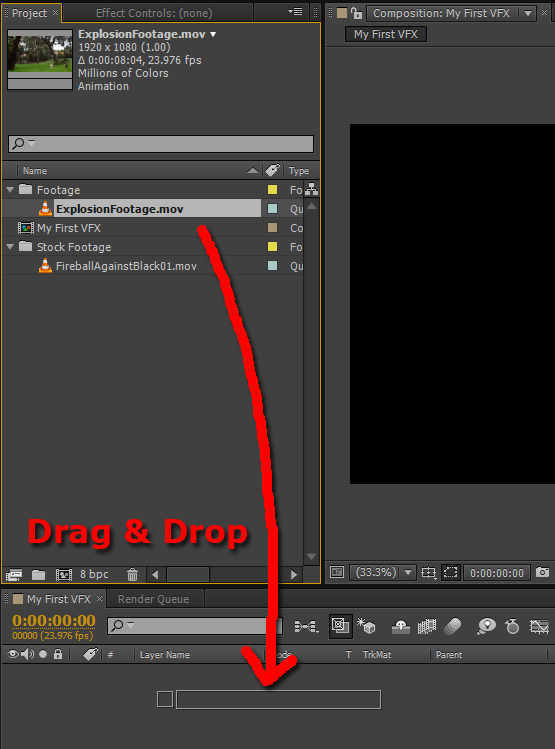
Ensure that the explosion footage sits above the base footage as layer order is important in Adobe After Effects and layers on top will obscur any Layers beneath, unless they are blended or masked out.
You can rename any layer by selecting it and pressing the enter key on your keyboard and I do suggest you give your layers useful names :)
On the right side of the timeline you can now see the life bars for the two layers, indicating where the footage starts and where it ends. You can drag these bars around at will to change the timing of your layers and you can grab and drag the sides of the bars to trim the layers either from the start or from the end.

Move the explosion to where you want your explosion to start. Keep an eye on the preview window and play back your composition (space key) to ensure the timing is ok. To remove the big ‘detonation films’ logo from the start of the explosion clip, grab the left side of the explosion layer life bar and drag it a few frames to the right to trim the frames from the start.
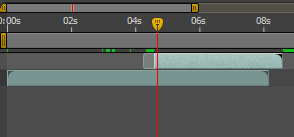
You can click on the explosion directly in the preview window and move it around to reposition it in the scene. You can click on the little squares on the corners and drag them to resize the layer. If you hold the shift key pressed while rescaling your layer, it will be scaled up or down uniformly.
Place the position in your scene exactly where you want it.
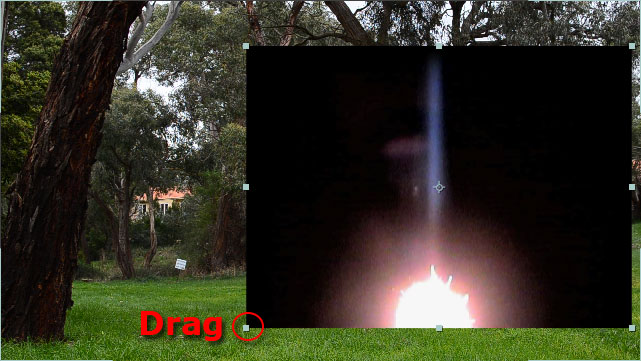
Now you may have noticed that there is a huge black ugly rectangle around our explosion!
Let’s get rid of it!
There are many ways to remove the black of the explosion stock footage, but since I want to get this blog post finished someday, I am going to focus on the 2 main options:
- Apply a ‘Color Key’ effect to the layer to make black areas transparent
- Change the blending mode of the layer to ‘add’
Because I want to show you how to apply effects to layers in Adobe After Effects, let’s use a color key effect to remove the black around the explosion first :)
Go to the Effects & Presets panel on the right side of the screen and search for the ‘Color Key’ effect. You can apply this effect to the explosion layer either by dragging it from the Effects & Presets panel onto your layer or, if you have your layer already selected, simply double clicking on the effect :)

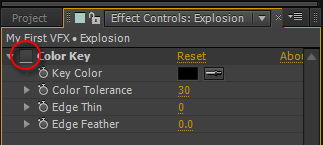
You should notice that when you applied the colour key effect, the space where the Project Tab is usually displayed changed over to the ‘Effect Controls tab’.
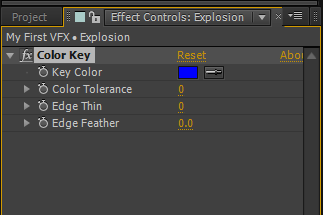
This tab shows you all the effects and their parameters available on the currently selected layer. Currently, the black around our explosion is still visible, so let’s configure the colour key effect to remove it.
Simply click on the colour picker for the ‘Key Colour’ parameter and click on the black of your explosion! Voila! Most of the black should be gone :) However, I am also going to increase the Color Tolerance to remove as much black as I can without cutting into the explosion.
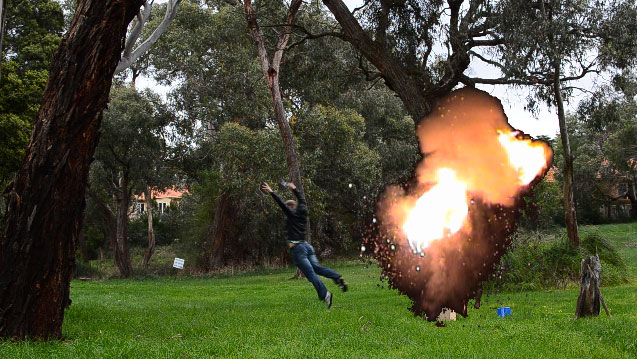
I will show you an easier and way better looking way in a moment, but I just wanted to show you how you can apply effects to your layers in After Effects. I encourage you to try out all the effects available and just play around with them and see what they do :)
I will quickly remove the colour key effect. You can do that either by clicking on the little FX icon next to the effect name to disable it or by selecting the effect in the Effect Control panel and hitting delete on your keyboard.
Now let’s remove the black of the explosion by using a different blend mode :)
After Effects supports different blending modes for layers. In the layers window you should see a column called ‘Mode’.
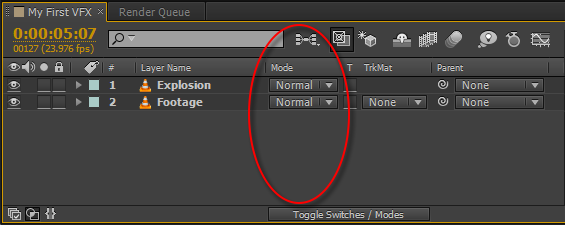
If you cannot see this column, you may have to click on the ‘Toggle Switches / Modes’ button at the bottom of the screen.
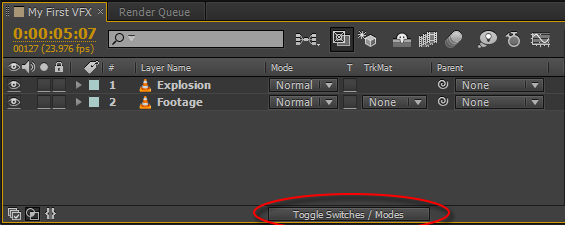
In the mode column, you can change the blending mode and thus affect the way the layer is blended together with the layers below it.
If we change the blend mode for our explosion layer to ‘Add’, the black around the explosion disappears and it looks a lot cooler!
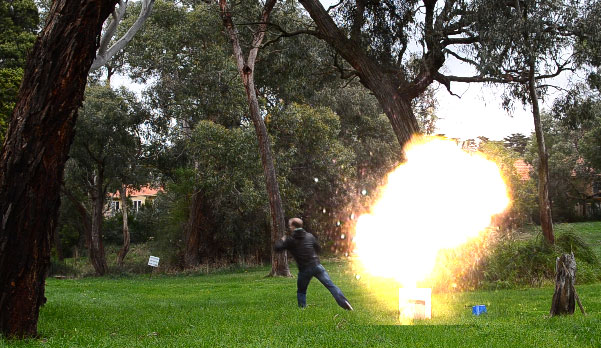
Try out the different blending modes to get a feel for what they do!
Now that we have our two layers blended together nicely, we’re ready to export our composition :)
Step 3 – Exporting the Composition
Once you have completed your composition, it is time to export it.
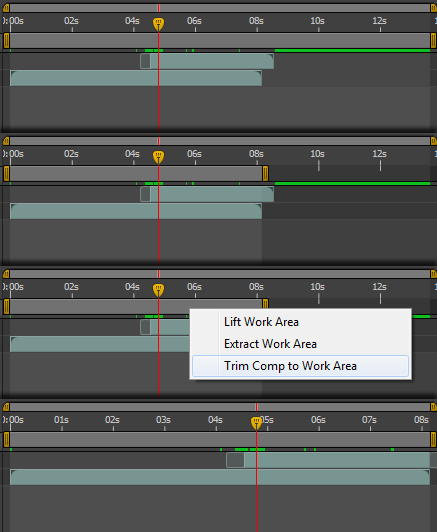
When you export a composition, the current ‘Work Area’ defines where the export will start and stop. The work area is defined by the little bar just above the life bar section of your timeline. You can define which area of your composition to export by dragging the work area start and end indicators to where you want them to be.
Once you have changed the current work area you can also right click on it and select ‘Trim Comp to Work Area’. This will change the start and end time of your composition to match your defined work area exactly :)
To export a composition, make sure it is open, e.g. you can see an active tab with the composition name in your timeline window, and go to Composition -> Add to Render Queue.
The render queue will appear as another tab in your timeline window with your composition already added, ready for export :)

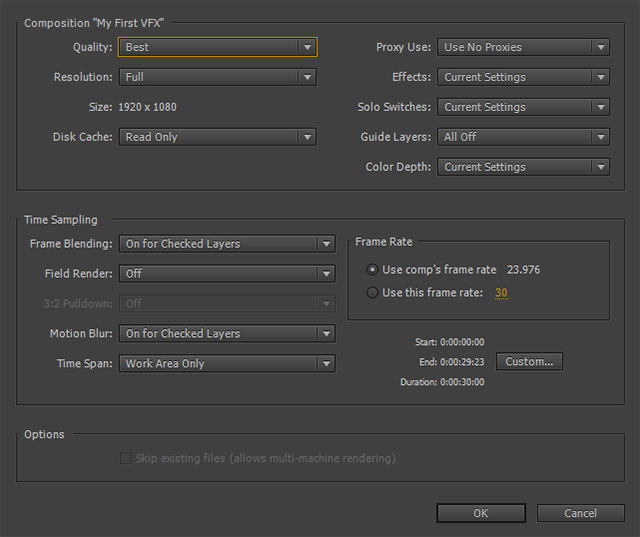
After Effects supports queued exporting of multiple items and each item can have its own settings. You can bring up the Render Settings dialog by clicking on the current render settings option. In this dialog you can configure the quality, resolution, frame rate and duration of the export.
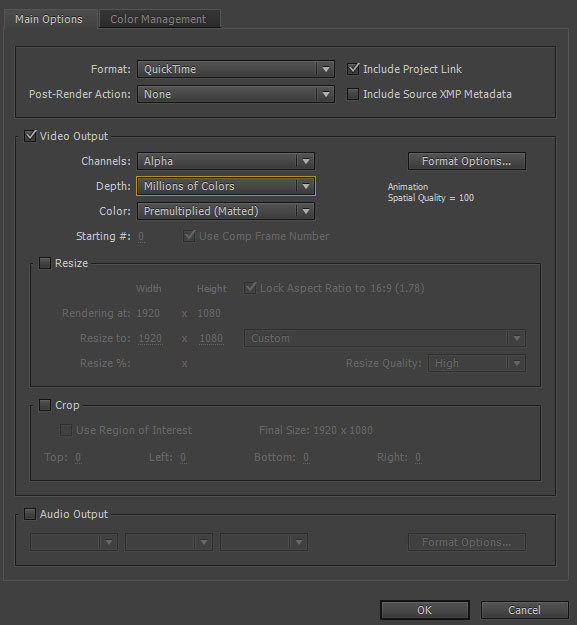
Click on Output Module option to bring up a dialog where you can configure the output format (video or image), compression quality, resize, crop and audio options. Note that audio is disabled by default and in my opinion, After Effects is not the best tool for audio to begin with, but if you want to export your composition with audio, remember to tick the checkbox :)
Click on the Output To file name to specify where you want to save your exported composition.
Once you set all those things up, you are ready to hit the ‘Render’ button to export your composition.
After Effects will show a progress bar appear at the top of your timeline and the preview window will update continuously until the export process is completed.
Once the file has been exported, locate it on your hard drive and play back your first VFX masterpiece to your heart’s content :)

I hope you enjoyed this tutorial and feel free to leave me any questions below and I will do my best to answer all of them so you can get started creating awesome VFX in Adobe After Effects!


65 Responses
fantastic i love to learn
So do I :) I also love to teach and it’s always great to see that people enjoy my tutorials! Thank you!
Hi Tobias, sorry to bother. I hope you will be able to help us.
We want to create a spectacular 3D animation intro to be used with our clan videos on youtube.
We have a basic idea of what we want, but zero clue how or with what to do it.
Can you please mail me so that I can discuss it with you, and if necessary we will be willing to pay for you help.
Hi Marius, I am always happy to try to answer any specific questions you may have as you try to create your intro, but due to having a full time job (that is not Surfaced Studio), I do not have the capacity to work on any outside projects myself. Feel free to send me a message via the ‘Contact’ page
Hi Tobias,
Just finished watching the first tutorial for beginners. Great work and there is absolutely nothing wrong with your acting during the explosion. lol
looking forward to making my first AE video. :)
Jeff
do u know how i can go from frame to frame ( aim trying to do a stick fight animation using after affects
AE is likely not the right tool, would be much easier to create a sequence with all the images in Premiere Pro to create a stop motion film. [youtube id=”sHHEQMdJdiA”]
Hello! I’m new to Adobe After Effects CS6 and the tutorial you’ve provided here has been a great help in getting started. As I’m becoming aware of the many things that can be accomplished with CS6, a question comes to mind. Is it possible in some way to save an individual layer or group of layers that can be imported into other projects?
I’m thinking that it would be advantageous if I could store layers that perform certain functions and them combine them, sort of like ‘snippets’ of code to create a new project that builds upon layers I’ve already built. In this way, I could pick and choose from layers that have already been developed to create new projects without having to reenter everything from scratch.
You can’t really create ‘snippets’, but you can easily import other AE projects. So you could create a project that contains your ‘snippets’ and then just import and re-use that in other projects as needed.
Great tutorial. You will be a good teacher!
(Peru)
Thank you very much :) Really glad you’re enjoying the tutorials!
Not since watching Andrew kramer’s early tutorials over at Videocopilot have I seen such easy to follow and helpful information. Subcribed! Thanks.
I feel very honoured, thank you :D I am a big fan of Andrew Kramer and videocopilot – it’s how I learnt – and it makes me really happy that people seem to enjoy my tutorials!
Thank you so much! I’m a great fan of Andrew’s work so I do feel very honoured when people compare my (unworthy) work to his awesome material :D
Clear, well presented and easy to follow tutorial..have just started to learn to use Ae and found this tutorial a great help..
Thank you for helping us absolute beginners :) Your videos are very concise, straight to the point & with step by step progressions onto higher levels of understanding. Excellent!
Really fine , and very helpful to beginners. detailed easy to understand- explanation. Thank you
Thank you for all of your tutorials. Keep making more!!!!!
Thanks Tobias.
Very useful – You have a good training technique.
You get the message over at a good pace, and without trying to show off, or getting too complex as most other tutors seem to do.
I look forward to all the other tutorials you have done.
Keep up the great work
Regards
Will
Thanks – I’ve got one week to finish two oil paintings, fix my Windows PC that has been dormant for 18 months, and produce a 3 minute video for college. I’ve never done any video editing before, so your tutorial is going to be extremely useful! :)
Thank you – Dankeshon. First ever useful beginner tutorial that i have seen. I work with Photoshop and Premiere but i hated those never ending talking guys make you hate this wonderful tool.
That’s great to hear. After Effects is a great tool, but it does have a bit of a learning curve to get over
Thank you for making this for absolute beginners. Was totally lost and no time to take classes on this. Will definitely view each and every tutorial you’ve made. Keep up the good work.
Thank you! Always great to hear that my tutorials are useful to others out there!
Thank you for the tutorial. I am very new to video editing and have been using imovie. I have been doing a lot of footage with a quadcopter and thus some footage is shaky. I purchased AE to use the warp editor. It looks like it is going to do the trick but I have two questions. First why does some of my composition go slower that other parts when I use warp. Also, and the most important, How do I render the video to be used in Imovie. Please remember that I am new to editing so a lot of easy things are new to me.
Thank you
1) When you say you see the ‘composition go slower’ is that when you preview it in After Effects or after you export it? 2) I have a VFX Vlog where I talk about how to export your video from After Effects. Once you’ve done that you can use it in any other program that supports the video format you exported in. Check it out! [youtube id=”LD52tt__Kc4″]
thank you so much. Your tutorials are awesome. Keep up the good work
can you teach us rotoscoping?
The three most common ways to rotoscope are: track mattes, animated masks and the rotoscoping tool. I have tutorials on all of those topics on my channel/website already :)
I was working with your gun muse video got to the part where you changed to opacity to 20% but well to be honest I got lost there can seen to find that option wondering if I’m not got the AE set up right or if I need to turn something on very interested in learning all I can .i’m working on a project that i need to know how to create cannon and gun fire effects as well as script narrating. any help would be very much welcomed. Thank you for your time and vids
IBT
To reveal the opacity setting on any later in AE, simply select it and press ‘o’. If you’re just getting started you might benefit from going through some of my After Effects beginner tutorials – there’s 7 in the series already
Thanks for doing what no one else does! Showing an up close pointer so I can actually see what to do. I have now been 4 days trying to simply add text into a template with 0 success. hoping you have a video on that!
I don’t have a video on that. What exactly are you stuck on?
thanks dude.. you’re so cool.. this is the gateway for me into the visual effect video realm.. God Bless you
This is tg the best tutorial for any beginner, feels ease to get things done, thank you
I just wanted to say thanks for your time and effort!this is super helpful and it’s much appreciated! :)
ps.you are Awesome :D
thanks…it is indeed very helpful
Thanks for these tutorials, Tobias. I have learned so much more from your first tutorial than from anybody else. You’re going to be my go-to-guy for all things After Effects from now on!
Excellent tutorial with visible snapshots…very impressive…clarity in expressing the thoughts..kudoos :)
Fantastic Tutorial. Even though I was familiar with the basics, this was just the kind of Tutorial I was looking for. This site is now bookmarked !!!
Thank you for your tutorial Tobias!!! It’s really useful and easy to understand!
I just have a problem that I can’t download the Explosion stock footage :D
Thank you very much Luna. I think detonationfilms.com have recently changed their website and so they made it harder to get to the free stock footage. Another site worth checking out is footagecrate.com. I really gotta look into making my own stock footage for people to use :)
Hi Tobias.
Great tutorials. I’m reasonably OK with Photoshop but AE and Premiere are somewhat more difficult for me to learn as I’m what you may call an old timer….(70+) It get’s harder as you get older !
There are so many bad tutorials on the web which do not help at all but yours is super. Clear dialogue with easy to follow instructions.
One thing I would like to learn, what are all those funny little icons to the left of the time line in AE ?
Keep up the good work….Chris.
Hi Chris, great to hear you are enjoying the wonderful world of Premiere and After Effects and I believe you’re never too old or too young to discover new hobbies and new exciting things. Glad to hear you are enjoying my tutorials and I will put a small tutorial post on my to-do list to explain the little layer icons in AE. Most of them are actually pretty simple, some enable motion blur or frame blending, you can use some to make your layers 3D (I show that in my 3D basics tutorial). If you are just getting started, I do have a properly structured 8 part beginner series that might be useful to you: https://www.surfacedstudio.com/tutorials/adobe-after-effects-for-beginners
Regards and good luck!
Do you have any after effect tutorials to make Guild Wars 2 kind of cutscenes that they make with their concept art? If you do that would be great. Thanks
Thanks. This really a very useful after effect tutorial for me as a beginner.
it’s a great tutorial and your are so fun. keep doing this work.
thank u :)
great tutorial.its my first time to check out your work but am loving it
Thank you!
Your tutorials is very best tutorials – i like it great work – i like your hit by a car tutorial
Great tutorials! Information given the way I need it to be given. Where can I find the video resources for the beginner series so that I can do the tutorial with you?
Great to hear you are enjoying my videos. Unfortunately I don’t have the resources for my older videos – it’s something I only started to provide a few years ago for all my newer videos
Hi, How to enable display acceleration
There’s an official page in the Adobe help documentation on how to open GPU acceleration: https://helpx.adobe.com/after-effects/using/rendering-opengl.html
Hi Tobias, I found your website and it’s exactly what I’ve been looking for to learn after effects! Thanks so very much for the tutorial. I plan to view all of your beginner tutorials and improve my abilities in after effects.
Thank you very much for the awesome feedback! Great to hear you are enjoying my tutorials :)
Hi… can you give me this notes with pdf sir…
Hi, unfortunately I do not have my website in PDF format. Your best option is likely to just hit PRINT on your browser and print to PDF :)
Thank you so so much. I have been procrastinating on trying to learn Aftereffects out of sheer nervousness, and you have just demystified it.
That is great to hear, thank you for the feedback. And have fun learning After Effects :)
Fantastic tutorial! I’ve already improved so much thanks to you!
Can you tell me how to make the life bars for the layers appear if they’re not there? I have copied text from another composition and I guess the life bars are stuck at the wrong time now. Cheers mate!
Thank you! You can just drag the sides of the layer to extend its life across your composition at will :)
OMG, you helped me learn a lot.
Thank you for the tutorial.
You are welcome!
That’s great to hear :)